Wednesday, November 6, 2024
Step-by-step instructions for building a coffee table

This guide provides a detailed step-by-step approach to constructing a simple yet elegant coffee table, suitable for a beginner woodworker. The project employs basic woodworking techniques and readily available materials.
Materials:
Wood: Choose hardwood like maple, cherry, or walnut for a sturdy and visually appealing table. Softwoods like pine or fir can be used for a more budget-friendly option.
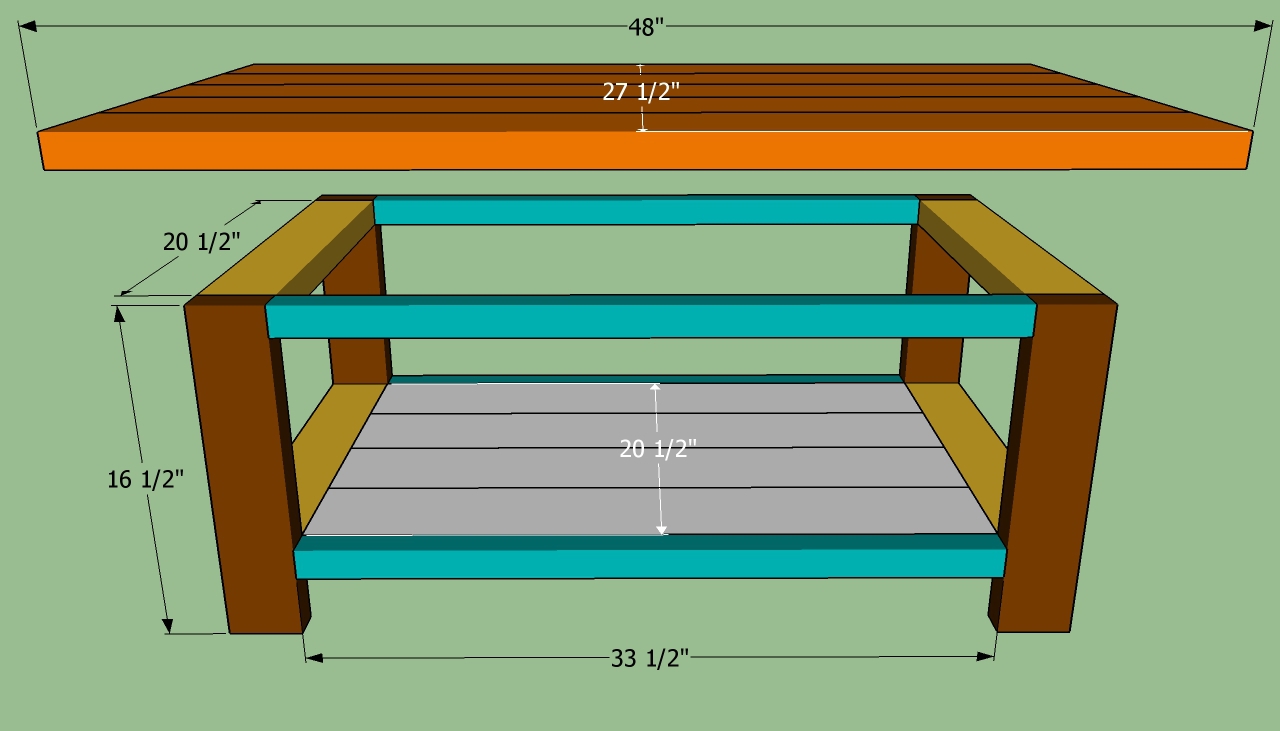
Top: A single piece of wood measuring approximately 36" x 24" x 1" (91.4 cm x 61 cm x 2.5 cm). Adjust the size according to your preference.
Legs: Four pieces of wood measuring 18" x 3" x 3" (45.7 cm x 7.6 cm x 7.6 cm).
Fasteners:
Wood screws: 2" (5 cm) long, approximately 20 screws.
Pocket hole screws: 2.5" (6.35 cm) long, approximately 8 screws.
Wood glue: Titebond II or similar wood glue.
Wood filler: For filling any gaps or imperfections.
Sandpaper: Assortment of grits, from coarse (80 grit) to fine (220 grit).
Wood finish: Stain, paint, or oil-based finish of your choice.
Finishing supplies: Paintbrushes, rags, gloves, respirator, and safety glasses.
Tools:
Table saw: For cutting the wood to size.
Circular saw: For making cuts if a table saw is unavailable.
Drill: For drilling pilot holes for screws and countersinking.
Pocket hole jig: For creating angled holes for hidden screws.
Clamps: For securing wood during assembly.
Measuring tape: For precise measurements.
Pencil: For marking the wood.
Level: For ensuring the table is level.
Hammer: For tapping screws into place.
Screwdriver: For driving screws.
Step 1: Cutting the Wood
1. Table Top: Cut the top panel to your desired dimensions using a table saw or circular saw.
2. Legs: Cut the four legs to the desired height using a table saw or circular saw.
Step 2: Preparing the Legs
1. Sanding: Sand all sides and edges of the legs with coarse sandpaper (80 grit) to remove any rough spots. Progress to finer grits (120, 180, 220) for a smooth finish.
Step 3: Creating Pocket Holes
1. Pocket Hole Jig: Set up the pocket hole jig according to the manufacturer's instructions.
2. Drilling Pocket Holes: Drill two pocket holes on each leg, positioned approximately 1.5" (3.8 cm) from the top edge.
Step 4: Assembling the Legs
1. Position: Place the legs at each corner of the table top, leaving a gap between the legs and the edge of the top.
2. Clamp: Secure the legs to the top using clamps.
3. Attaching Legs: Drill pocket hole screws through the pocket holes into the table top, securing the legs to the top.
Step 5: Finishing the Table
1. Sanding: Sand the entire surface of the table, including the edges, using fine sandpaper (220 grit) for a smooth finish.
2. Filling Gaps: Use wood filler to fill any gaps or imperfections in the table top or between the legs and the top. Let the filler dry completely according to the manufacturer's instructions.
3. Sanding: Sand the filled areas smooth using sandpaper.
4. Finishing: Apply your chosen finish, such as stain, paint, or oil-based finish, following the manufacturer's instructions. Apply multiple coats as needed.
Step 6: Additional Touches
1. Edges: Round over the sharp edges of the table top and legs using a router or sandpaper to create a more finished look.
2. Hardware: Add any hardware details like a shelf, drawers, or decorative accents according to your design.
Finishing Up
1. Cleanup: Remove any dust or debris from the table.
2. Placement: Place the coffee table in its desired location and enjoy your handcrafted piece.
Safety Precautions:
Always wear safety glasses and a respirator when working with wood dust.
Use caution when operating power tools.
Ensure proper ventilation when using wood finishes.
Customization:
This guide provides a basic framework for building a coffee table. Feel free to experiment with different wood species, sizes, and finishes to personalize your table.
Explore additional features like a shelf underneath, drawers, or built-in storage compartments.
Tips:
Use a piece of scrap wood to practice cutting and drilling before working on the actual table.
Check your measurements carefully to ensure precise cuts and alignment.
Apply wood glue to the joints before attaching the legs.
Allow ample drying time between coats of finish.
Congratulations! You have successfully built a beautiful and functional coffee table. Enjoy its beauty and use for years to come.
0 comments:
Post a Comment
Note: Only a member of this blog may post a comment.