Wednesday, November 20, 2024
How to Build and Sell Chess Tables with a Unique Twist on Classic Designs

Building and Selling Chess Tables with a Unique Twist on Classic Designs
The timeless game of chess has captivated minds for centuries. Its intricate strategies, elegant pieces, and the thrill of intellectual combat continue to allure players of all ages. However, the experience of playing chess is often elevated by the setting. A beautifully crafted chess table can transform a simple game into an immersive and aesthetically pleasing affair.
Recognizing this, savvy entrepreneurs are exploring opportunities to create and sell unique chess tables that cater to the discerning tastes of chess enthusiasts. This article delves into the intricacies of building and selling chess tables with a distinctive twist on classic designs, providing a comprehensive guide for aspiring entrepreneurs.
Understanding the Market Demand
Before embarking on any business venture, it is essential to understand the target market and its demands. The chess table market encompasses a diverse range of customers, from casual players seeking an elegant addition to their homes to serious collectors looking for handcrafted masterpieces.
Identifying the Target Audience
The primary target audience for unique chess tables can be categorized into the following:
- Chess enthusiasts: These individuals are passionate about the game and appreciate high-quality, functional tables.
- Home décor enthusiasts: Seeking unique and stylish furniture pieces, they are drawn to the aesthetic appeal of handcrafted chess tables.
- Collectors: This segment values rarity, craftsmanship, and historical significance, potentially investing in limited-edition or custom-made chess tables.
- Gift buyers: Looking for extraordinary gifts for special occasions, they might seek chess tables as unique and memorable presents.
Analyzing Market Trends
The market for chess tables is dynamic and influenced by several factors:
- Growing popularity of chess: The resurgence of chess, fueled by popular culture and streaming platforms, drives demand for quality chess equipment, including tables.
- Rise in artisanal craftsmanship: Consumers are increasingly valuing handmade items and appreciate the unique character of handcrafted chess tables.
- Focus on personalized experiences: Custom-designed chess tables that reflect the individual preferences and tastes of buyers are gaining traction.
Developing a Unique Selling Proposition (USP)
In a competitive market, establishing a distinct USP is crucial for standing out. Here are some potential USPs for chess tables:
Design Innovation
- Modern interpretations of classic designs: Reimagine traditional chess table styles with contemporary elements, such as sleek lines, minimalist aesthetics, and innovative materials.
- Fusion of cultures: Blend elements from different cultures or time periods to create a unique and visually captivating design.
- Thematic tables: Design chess tables around specific themes, such as historical events, fictional worlds, or natural elements.
Craftsmanship and Materials
- Use of exotic woods: Emphasize the beauty and durability of rare and sustainable hardwoods.
- Hand-carved details: Incorporate intricate carvings, inlays, and decorative elements to elevate the craftsmanship.
- Unique finishes: Experiment with different finishes, such as hand-rubbed oils, natural waxes, or specialized lacquers, to achieve distinctive textures and colors.
Functionality and Features
- Built-in storage: Include drawers or compartments for storing chess pieces, books, and other accessories.
- Integrated lighting: Add LED lights to illuminate the playing surface and enhance the ambiance.
- Adjustable height: Offer tables with adjustable height options for comfortable play.
Building a High-Quality Chess Table
Crafting a high-quality chess table demands precision, skill, and attention to detail. Here's a step-by-step guide:
Choosing Materials
- Wood selection: Consider the aesthetics, durability, and workability of different wood species. Popular choices include mahogany, walnut, cherry, maple, and oak.
- Tabletop material: Ensure the tabletop is smooth, durable, and provides a stable surface for the chessboard.
- Hardware: Select high-quality hinges, drawer slides, and other hardware components for longevity and smooth operation.
Design and Construction
- Sketching and planning: Create detailed sketches and blueprints outlining the dimensions, design elements, and construction process.
- Cutting and shaping: Precisely cut and shape the wood components using hand tools or woodworking machinery.
- Assembly: Join the various components using woodworking techniques, such as mortise and tenon joints, dovetail joints, or glue.
Finishing Touches
- Sanding and smoothing: Smooth the surface of the table using various grits of sandpaper to create a flawless finish.
- Applying finishes: Apply multiple coats of stain, varnish, or lacquer to protect the wood and enhance its natural beauty.
- Adding details: Incorporate decorative elements, such as carvings, inlays, or metal accents, to create a unique and eye-catching design.
Marketing and Selling Chess Tables
Once the chess tables are crafted, it's time to bring them to market. A successful marketing and sales strategy is essential for reaching the target audience and generating revenue.
Building an Online Presence
- Website: Create a professional website showcasing the unique designs, craftsmanship, and features of your chess tables. Include high-quality images and detailed descriptions.
- Social media: Establish a presence on relevant social media platforms, such as Instagram, Pinterest, and Facebook, to engage with potential customers and promote your products.
- Online marketplaces: List your chess tables on online marketplaces like Etsy, eBay, and Amazon, expanding your reach and connecting with a broader audience.
Offline Sales Channels
- Craft fairs and art shows: Participate in local events to showcase your work directly to potential buyers.
- Retail partnerships: Collaborate with specialty stores, gift shops, and furniture retailers to sell your chess tables through their channels.
- Custom orders: Offer custom-designed chess tables to cater to the unique preferences of individual customers.
Pricing Strategy
Determine a fair price that reflects the quality, craftsmanship, and uniqueness of your chess tables. Consider factors such as materials, labor costs, market demand, and competitive pricing.
Conclusion
Building and selling chess tables with a unique twist on classic designs can be a rewarding and profitable venture. By understanding the market, developing a strong USP, crafting high-quality tables, and implementing effective marketing strategies, aspiring entrepreneurs can establish a successful business in this niche market.
Remember, the key to success lies in creating beautiful and functional chess tables that resonate with the passions of chess enthusiasts and home décor aficionados. With dedication, creativity, and a commitment to excellence, entrepreneurs can carve out a unique space for themselves in the world of handcrafted chess tables.
Tuesday, November 19, 2024
Simple Picture Frame Projects for Extra Cash

Simple Picture Frame Projects for Extra Cash: DIY Your Way to a Side Hustle
Hey there, crafty friend! Are you looking for a fun and rewarding side hustle that doesn't require a ton of upfront investment? Well, you're in luck! Picture frame projects are a fantastic way to turn your creativity into cold, hard cash. Whether you're a seasoned DIY pro or just starting out, there's a picture frame project out there for you. So grab your glue gun, dust off those old frames, and get ready to craft your way to a little extra income.
Why Picture Frame Projects Rock
Here's the thing: picture frames are EVERYWHERE. They're in homes, offices, stores, and even restaurants. And they're always in demand, especially for custom or unique styles. Here's why picture frame projects make a fantastic side hustle:
- Low Startup Costs: You can probably find most of the supplies you need around your house or at a thrift store. And if you need to buy new materials, they're generally affordable.
- Versatile: There are endless possibilities when it comes to picture frame projects. You can paint, stain, decoupage, embellish, and even upcycle old frames to create one-of-a-kind pieces.
- Easy to Market: Etsy, Facebook Marketplace, and local craft fairs are just a few places you can sell your creations. Plus, you can easily showcase your work on social media to attract potential customers.
- Profitable: You can often make a decent profit on picture frames, especially if you use unique or high-quality materials.
- Creative Outlet: This side hustle is a great way to express your creativity and have fun while you're earning some extra cash.
Picture Frame Project Ideas to Get You Started
Now that you're convinced picture frame projects are the way to go, let's dive into some inspiring ideas:
Classic Makeover
This one is a classic for a reason! It's simple, affordable, and can be personalized to suit any style.
- Start with a basic frame: Thrift stores are goldmines for inexpensive frames. Look for solid wood frames or even old metal frames that you can easily revamp.
- Prep the frame: Give it a good cleaning and sand it down if needed. This will help the paint or stain adhere better.
- Get creative with color: Choose your favorite paint colors, a trendy stain, or even use metallic spray paint for a unique touch. Don't be afraid to experiment!
- Add details: Consider adding embellishments like decoupage paper, stencils, or even fabric scraps for a more personalized look.
Upcycled Frames
Give old frames a new lease on life with these creative upcycling ideas!
- Turn them into a mirror: Replace the glass with a mirror sheet, and you've got a stylish accent piece!
- Create a chalkboard frame: Paint the frame with chalkboard paint and let customers personalize it with their own messages or artwork.
- Build a shadow box: Use a deep frame to create a 3D shadow box. This is perfect for displaying small items like keepsakes, jewelry, or even miniature scenes.
- Make a decorative tray: Remove the glass and backing, and you've got a unique and stylish tray for serving snacks or displaying decorative items.
Creative Frame Embellishments
Embellishing frames is a great way to add personality and make them stand out from the crowd. Here are a few ideas to get your creative juices flowing:
- Washi tape: Create geometric patterns, stripes, or even add a pop of color with colorful washi tape.
- Fabric: Use fabric scraps to cover the frame, adding a touch of texture and personality.
- Dried flowers and foliage: Attach pressed flowers or dried leaves for a rustic and charming aesthetic.
- Metal accents: Add metallic accents like gold or silver leaf, or even use wire to create unique designs.
Pricing Your Picture Frames
Now that you're ready to start making picture frames, you need to figure out how much to charge. Here's a simple breakdown to help you get started:
- Cost of Materials: Add up the cost of all materials, including the frame, paint, embellishments, and any other supplies you used.
- Time Investment: Consider the time it took to make the frame, and factor in your hourly rate. You're not just selling the materials; you're also selling your skills and creativity.
- Competition: Take a look at what other artists and crafters are charging for similar frames. This will give you a good idea of what the market is willing to pay.
- Profit Margin: Aim for a profit margin of at least 20-30%. This will ensure that you're making a decent profit on each frame.
Don't be afraid to experiment with your pricing! You can always adjust it based on customer feedback and market demand.
Marketing Your Picture Frame Projects
Once you've got your beautiful picture frames ready to go, it's time to start promoting them. Here are a few tried-and-true marketing strategies:
- Online Marketplaces: Etsy, Facebook Marketplace, and even Instagram Shops are great platforms to sell your handmade items.
- Social Media: Create a dedicated Instagram or Facebook page for your picture frame business. Share photos of your work, run contests, and engage with potential customers.
- Local Craft Fairs and Events: Set up a booth at local craft fairs and markets to showcase your frames and connect with customers in person.
- Word-of-Mouth: Don't underestimate the power of word-of-mouth marketing. Ask friends and family to spread the word about your business.
Frequently Asked Questions
What kind of paint should I use for picture frames?
Acrylic paint is a great choice for picture frames because it dries quickly, comes in a wide range of colors, and is easy to clean up. You can also use chalk paint, milk paint, or even spray paint for a more unique finish.
Where can I find old picture frames to upcycle?
Thrift stores, antique shops, and even flea markets are great places to find old picture frames at bargain prices. You can also check out estate sales or online marketplaces like Craigslist or Facebook Marketplace.
How do I protect my picture frame creations?
You can use a sealant like varnish, polyurethane, or acrylic sealer to protect your picture frames from scratches, water damage, and UV rays. Just be sure to follow the manufacturer's instructions for best results.
What are some tips for selling my picture frames online?
Take high-quality photos of your frames in natural light, write detailed product descriptions, and offer competitive prices. Consider offering custom orders to make your business stand out!
There you have it, crafty friends! You now have the tools and inspiration to turn your passion for picture frames into a profitable side hustle. Get creative, have fun, and watch your picture frame business flourish!
Monday, November 18, 2024
Handmade Wood Items That Shoppers Are Looking For

Handmade Wood Items That Shoppers Are Looking For
Hey there, fellow wood-lovers! Are you a crafty soul with a passion for woodworking? Or perhaps you're just looking for unique and special gifts for the people in your life? Well, you've come to the right place! In today's post, we're diving deep into the world of handmade wood items, exploring what's trending, and what shoppers are actually looking for.
The demand for handmade wooden goods is booming, and for good reason. They're not only beautiful and unique, but also eco-friendly and sustainable. Plus, buying handmade supports small businesses and artisans, which is always a good thing! Let's take a look at some of the hot items that are flying off the shelves (or rather, out of Etsy shops!)
Home Decor That's Warm and Inviting
When it comes to home décor, people are gravitating towards items that bring a sense of warmth, comfort, and character to their living spaces. And what's more inviting than a piece made from natural wood? Here's a peek at some of the top-selling items:
Wooden Wall Art & Sculptures
From abstract art to intricate carvings, wooden wall art is a great way to add a touch of personality to any room. Think geometric designs, whimsical animal sculptures, or even custom-made pieces featuring family names or quotes. The possibilities are endless! And don't forget about the beauty of wood grain, a natural masterpiece in itself.
Wooden Serving Trays & Platters
These are not just functional, but also make a statement. A beautiful wooden serving tray can elevate any meal, from a casual breakfast to a fancy dinner party. Look for trays with interesting shapes, unique finishes, and even personalized engravings for an extra special touch. And let's be real, they're just plain gorgeous!
Wooden Coasters & Trivets
These small but mighty items are a must-have for any coffee or tea lover. Coasters protect your furniture from heat and spills, while trivets are perfect for hot pots and pans. Handmade coasters come in all shapes, sizes, and styles â€" from simple and minimalist to intricate and colorful.
Kitchen Essentials with a Touch of Craftsmanship
The kitchen is the heart of the home, and it deserves some love too! Here are some kitchen essentials that shoppers are clamoring for:
Wooden Cutting Boards
Durable, stylish, and eco-friendly - what's not to love? Handmade cutting boards are perfect for prepping meals, serving cheese, or even using as a decorative piece. They're available in a wide range of sizes, woods, and finishes, so you can find the perfect one to match your kitchen style.
Wooden Utensil Holders
These are a great way to keep your kitchen organized and tidy. Handmade holders come in various shapes and sizes, and can even be personalized with names or initials. They also make a great housewarming gift, especially for those who appreciate a touch of handmade charm.
Wooden Spoons & Spatulas
Wooden utensils are gentle on your cookware and add a touch of rustic elegance to any kitchen. They're also naturally antimicrobial, which makes them a great choice for those who are conscious about food safety.
Personal & Unique Gifts That Stand Out
Forget about generic gifts! When it comes to giving presents, people are seeking out something special and unique, and handcrafted wooden items definitely fit the bill. Here are a few ideas:
Engraved Wooden Boxes
Perfect for storing jewelry, keepsakes, or even small treasures, these boxes are a thoughtful and personal gift. They can be engraved with names, initials, dates, or even special quotes.
Wooden Watches & Jewelry
Handmade wooden watches and jewelry pieces are all the rage! They offer a unique and stylish alternative to traditional metal options. Look for watches with intricate wood grain patterns and bracelets with beautiful beads and charms.
Personalized Wooden Toys
Looking for something special for the little ones? Handmade wooden toys are a safe and sustainable option that promotes imaginative play. Think about wooden blocks, puzzles, cars, dolls, and even rocking horses.
Things to Consider When Buying Handmade Wood Items
Now that you're ready to dive into the world of handmade wood items, here are a few things to keep in mind:
Commonly Asked Questions
Where can I find handmade wood items?
You can find handmade wood items online through platforms like Etsy, Amazon Handmade, and even directly from the artists' websites. You can also often find them at local craft fairs, farmers' markets, and art galleries.
Are handmade wood items durable?
Yes, they can be very durable! They're often made with high-quality wood and finished with durable coatings to protect them from wear and tear. Just be sure to follow the care instructions provided by the artist.
How do I care for my handmade wood items?
Most handmade wooden items require simple care, such as dusting with a soft cloth. Avoid using harsh chemicals or abrasive cleaners. For items with a wax finish, you can reapply wax periodically to maintain their shine.
There you have it! Hopefully this guide has inspired you to explore the world of handmade wood items. They're not just beautiful and unique, but also a great way to support small businesses and artisans. Happy shopping!
Wednesday, November 13, 2024
How to Craft Wooden Chess Tables with Adjustable Heights for Comfort

Elevate Your Chess Game: Crafting Adjustable Height Wooden Chess Tables for Ultimate Comfort
Chess, the game of strategy and intellect, deserves a playing surface as grand as the battles waged upon it. But let's face it, sitting for long periods, especially hunched over a low table, can take its toll. That's where adjustable height chess tables come in! Imagine the luxury of effortlessly adjusting your table to your perfect playing height, ensuring maximum comfort and focus. Not only does this promote better posture, but it also elevates the entire chess experience to new heights (pun intended!).
This guide will walk you through the process of crafting your own adjustable height wooden chess table, empowering you to build a truly personalized masterpiece. Let's dive into the exciting journey!
Planning the Perfect Chess Table
Before diving into the woodshop, it's crucial to plan out the design and features you desire. Consider these key factors:
Size and Dimensions
The size of your table will depend on your personal preference and the size of your chess set. Standard chessboards measure 19 inches by 19 inches. A comfortable playing space around the board is crucial. Aim for a table width of at least 24 inches and a length of at least 30 inches. Ensure ample legroom beneath the table.
Height Adjustment Mechanism
The most popular and user-friendly options for height adjustment include:
- Hand Crank Mechanism: This classic system offers smooth and reliable height adjustment. It's a robust and often favored choice for its simplicity and ease of use.
- Gas Lift Mechanism: Gas lift systems offer effortless height adjustment with a gentle push or pull. They are ideal for quick and convenient adjustments, but may not be as robust as hand crank systems.
- Electric Motor System: For the ultimate in luxury and convenience, consider an electric motor system. With the touch of a button, you can adjust the table to your desired height with ease.
Choose the mechanism that best suits your budget, desired level of functionality, and aesthetic preferences.
Wood Selection
The choice of wood for your chess table is crucial. Consider factors like durability, aesthetics, and budget. Popular options include:
- Hardwood: Woods like maple, cherry, walnut, and mahogany offer strength, durability, and stunning grain patterns. They're excellent choices for creating a timeless and elegant chess table.
- Softwood: Pine and cedar are more affordable options, providing a rustic and warm aesthetic. However, they may require more careful handling and maintenance.
Remember to select wood that is properly seasoned and free from knots or defects.
Finishing Touches
The finishing touches can truly make your chess table stand out. Consider these options:
- Stain: Enhance the natural beauty of the wood with a stain that complements its grain. Choose a color that suits your personal style and the overall ambiance of the room.
- Polyurethane: Protect the wood from scratches and moisture with a clear polyurethane finish. It provides a durable and long-lasting shield, enhancing the table's longevity.
- Hardware: Select high-quality hinges, bolts, and knobs for the height adjustment mechanism. Ensure they are compatible with your chosen design and materials.
Construction Process: Building Your Chess Table
With your design finalized, you can begin the exciting process of building your chess table. Here's a step-by-step guide:
Cutting the Wood
Measure and cut the wood according to your plans. Use precision tools like a miter saw or table saw for accurate cuts. Remember to leave some extra wood for sanding and fitting later.
Assembling the Tabletop
Assemble the table top using strong wood glue and screws. Make sure the tabletop is flat and sturdy. For extra strength, consider using corner blocks or braces.
Creating the Height Adjustment Mechanism
If you're using a hand crank mechanism, attach the crank to a threaded rod. Secure the threaded rod to the tabletop using brackets. If you're using a gas lift mechanism, mount the mechanism to the table frame. For electric motors, follow the manufacturer's instructions for installation.
Constructing the Table Frame
Assemble the table frame using strong wood glue and screws. Ensure the frame is square and level. You can use corner brackets or braces for added strength. Attach the table frame to the tabletop using strong wood screws.
Finishing and Detailing
Sand all the surfaces smooth, removing any sharp edges or imperfections. Apply your chosen stain and finish according to manufacturer instructions. Allow the finish to cure completely before assembling the chess table.
Installing the Chessboard
If you are installing a permanent chessboard, mark and cut the appropriate size opening in the tabletop. Attach the chessboard using screws, ensuring the playing surface is level.
Adding a Personal Touch: Making Your Chess Table Unique
Once the basic construction is complete, it's time to unleash your creativity! Here are some ways to personalize your chess table:
- Inlay: Enhance the table top with elegant wood inlays, creating beautiful geometric patterns or intricate designs. Use different colored woods to create a unique look.
- Carving: Add decorative elements to the table's legs or frame with intricate carvings. Carve chess pieces, symbols, or decorative motifs to add a personalized touch.
- Storage: Create a hidden storage compartment beneath the table to hold chess pieces, books, or other accessories. This is a practical and stylish addition.
- Lighting: Incorporate LED lights beneath the tabletop to illuminate the chessboard and create a captivating ambiance.
Tips and Tricks for Success
Building an adjustable height chess table can be a rewarding project, but there are a few things to keep in mind to ensure a smooth and successful build:
- Plan Thoroughly: Before starting, carefully plan out your design and dimensions. Create detailed drawings or sketches to guide the construction process.
- Use Quality Materials: Invest in quality wood, hardware, and finishing products. This will ensure your chess table is sturdy, durable, and looks great for years to come.
- Take Your Time: Don't rush the construction process. Pay attention to detail and ensure all joints are tight and secure. Patience and precision will lead to a better finished product.
- Sanding is Key: Thoroughly sand all surfaces to ensure a smooth and polished finish. It's also essential for applying stain and polyurethane evenly.
- Protect Your Work: When applying stain or polyurethane, work in a well-ventilated area and wear protective gear, including a mask and gloves.
Building your own adjustable height wooden chess table is a project that combines skill, creativity, and a love for the game. It's a chance to create a piece of furniture that will bring joy for years to come. Enjoy the process, embrace your creativity, and let the chess battles begin!
How to Install Wood Floating Shelves without Brackets

Floating Shelves Without Brackets: A DIY Guide
Hey there, fellow DIY enthusiast! Are you tired of those bulky brackets taking up valuable space on your walls? Ready to elevate your décor with the sleek and modern look of floating shelves? Well, you're in luck! We're going to dive into the exciting world of installing floating shelves without brackets, making your walls look cleaner and your shelves look like they're defying gravity. Get ready for a fun, step-by-step journey that'll leave you feeling like a bona fide home improvement hero!
Choosing the Right Floating Shelves
First things first, let's pick out the perfect floating shelves for your space. There are so many amazing options out there, from simple and rustic to sleek and modern. Here's a rundown of the key factors to consider:
Material:
- Wood: Classic, versatile, and can be stained or painted to match your décor.
- Metal: Industrial chic, often lightweight and durable.
- Glass: Sleek and contemporary, perfect for showcasing prized possessions.
- Plastic: Affordable and moisture-resistant, great for bathrooms or kitchens.
Size:
Consider the width, depth, and height of your shelves. Think about the items you want to display and make sure the shelves are big enough. You don't want your books or knick-knacks looking cramped!
Depth:
The depth of the shelf influences its stability. A deeper shelf will naturally be sturdier, especially if you're planning on placing heavier items on it.
Style:
This is your chance to express your personality! Do you love a farmhouse feel, minimalist vibes, or something totally unique? Choose a style that complements your existing décor.
Installation Preparation
Now that you've got your awesome shelves, let's get ready to install them! This is where we'll make sure everything is in place for a smooth and successful installation.
Understanding Your Wall Type:
Knowing what's behind your drywall is crucial for choosing the right anchors and screws. Here's a quick rundown of common wall types:
- Drywall: This is the most common wall material in homes. It's relatively easy to work with, but it requires the right anchors for support.
- Plaster: Often found in older homes, plaster is a bit harder to work with than drywall, but it can be a good material for hanging heavy objects.
- Concrete: A strong and durable material, but it's often harder to drill into.
Essential Tools:
Gather your tools to make the job easier:
- Stud Finder: This will help you locate the sturdy support beams in your walls for maximum support.
- Level: This ensures your shelves are perfectly straight and level, giving your room a polished look.
- Measuring Tape: For precise measurements to ensure everything fits perfectly.
- Pencil: To mark where you'll be drilling and installing your shelves.
- Drill: For drilling pilot holes and installing the anchors and screws.
- Screwdriver: For tightening screws and ensuring a secure installation.
Safety First!:
It's important to take precautions to ensure your safety during installation.
- Wear Safety Glasses: Protect your eyes from flying debris while drilling.
- Use a Dust Mask: Minimize inhaling dust particles while drilling and sanding.
- Avoid Drilling into Electrical Wires or Plumbing Lines: Double-check your plans and use a stud finder to stay away from electrical and plumbing areas.
Installation Process
Now comes the fun part! It's time to transform your wall with your amazing floating shelves.
Mark Your Wall:
Choose the perfect spot for your shelves and use your level and pencil to mark the desired location. You might want to use masking tape to create clear lines for your markings.
Locate Studs:
Using your stud finder, locate the supporting studs in your wall. These are the strong points that will hold your shelves securely.
Attach the Shelves:
Now comes the moment of truth! Take a look at your shelves and their instructions. Here are a few common installation methods:
- Hidden Brackets: These are discreet brackets attached to the back of the shelf. They often have a hidden mounting mechanism that attaches directly to the wall.
- Hidden Mounts: These are discreet mounts embedded within the shelf, typically on the back or underside. They require precise drilling and often use a special tool for installation.
Install Anchors (if needed):
If you're not attaching the shelves directly to studs, you'll need to use anchors for extra support.
- Select the Right Anchors: The size and type of anchors you choose will depend on the weight of your shelves and the material of your wall.
- Drill Pilot Holes: Use your drill to create pilot holes for the anchors. Follow the instructions that came with your anchors to ensure you're using the correct size and depth for the pilot holes.
- Install Anchors: Carefully insert the anchors into the pilot holes until they are flush with the wall.
Secure Your Shelves:
Once your anchors are installed (if needed), carefully position your shelves over the marked spots on the wall. Using your screwdriver, secure the shelves using the screws provided with the shelf.
Level and Adjust:
Using your level, double-check that your shelves are perfectly straight and level. If they're not, you can gently loosen the screws and adjust the shelves until they are perfectly aligned.
Decorate Your Shelves
Your beautiful floating shelves are finally installed! Now comes the fun part: decorating! This is where you can express your style and personalize your space.
Curate Your Collection:
Think about the items you want to display. Do you have a collection of books, plants, photos, or artwork? Let your personality shine through in your curated collection.
Experiment with Height:
Play around with different heights and arrangements on your shelves. You can create a sense of visual interest by alternating the heights of your items and grouping similar objects together.
Add Personal Touches:
Don't be afraid to add personal touches to your shelves, such as small plants, candles, or decorative items. These little details can make your space feel even more inviting and unique.
Additional Tips for Success
Here are a few more helpful tips to help you achieve your floating shelf goals:
- Plan Your Layout: Before you start drilling, sketch out a rough layout of your shelves on paper. This will help you visualize the final look and ensure that your shelves are positioned strategically.
- Start with a Pilot Hole: Always start with a pilot hole when drilling into drywall. This will help prevent the drywall from cracking and make the installation process smoother.
- Use the Right Screw Size: Make sure you use the correct screw size for your wall type and shelf material.
- Don't Overtighten: Be careful not to overtighten the screws, as this can damage the shelves or wall.
- Clean Up: Once your shelves are installed, be sure to clean up any dust or debris.
And there you have it! You've conquered the world of floating shelves without brackets! Now go forth and enjoy the stylish, clutter-free look you've achieved. Your home is about to be the envy of the neighborhood!
Weekend Woodworking Projects for New Hobbyists

Weekend Woodworking Projects for New Hobbyists
Are you looking for a fun and rewarding hobby to pick up? Woodworking offers a unique blend of creativity, problem-solving, and the satisfaction of creating something tangible with your own hands. The best part? You don't need to be a seasoned craftsman to enjoy the benefits of woodworking. With a few basic tools and some simple projects, you can dive into this fulfilling hobby this weekend.
Beginner-Friendly Projects to Get You Started
For first-timers, it's crucial to start with projects that are manageable and offer a sense of accomplishment. These beginner-friendly options will help you gain confidence and build essential skills before tackling more complex endeavors.
1. Wooden Coasters
Coasters are a great first project because they require minimal material and skill. You can use scrap wood, plywood, or even tiles to create unique and functional coasters. Start by cutting the wood into squares or circles, then sand them smooth. You can personalize your coasters by staining, painting, or adding decorative elements like inlays or burned designs.
2. Simple Picture Frame
A picture frame is a classic woodworking project that allows you to showcase your favorite memories. Choose a simple design with mitered corners and use a miter saw or a hand saw for accurate cuts. Sand the frame smooth, stain or paint it, and add a backing and glass to complete the project. You can even get creative with different wood types or decorative molding to add a unique touch.
3. Wooden Cutting Board
A wooden cutting board is a practical and stylish addition to any kitchen. Choose a hardwood like maple or cherry for durability and a beautiful grain pattern. Use a table saw or a jigsaw to cut the board to your desired size, then sand it smooth to prevent splintering. You can add a handle with a router or a simple hole for hanging.
Essential Tools for Your First Weekend Workshop
While a fully equipped woodworking shop is a dream for many, you can get started with a few essential tools that will cover most beginner projects.
1. Hand Saw
A hand saw is a versatile tool for making straight cuts in wood. Choose a crosscut saw for cutting across the grain or a ripsaw for cutting along the grain.
2. Hammer
A hammer is essential for driving nails and securing wood components together. Opt for a claw hammer for easy nail removal.
3. Screwdriver
A screwdriver is crucial for fastening screws. Invest in a set with various sizes and types of screwdrivers for different applications.
4. Measuring Tape
A measuring tape is essential for ensuring accurate cuts and measurements. Choose a tape measure that is at least 25 feet long for larger projects.
5. Level
A level is crucial for creating straight and even surfaces. Choose a level that is at least 24 inches long for woodworking applications.
6. Sandpaper
Sandpaper is essential for smoothing wood surfaces. Choose a variety of grits, starting with a coarse grit for rough sanding and progressing to a fine grit for final finishing.
7. Safety Gear
Safety should be a top priority when working with wood. Invest in safety glasses, earplugs, and a dust mask to protect yourself from flying debris and wood dust.
Embrace the Process and Enjoy the Journey
Remember, woodworking is a journey, not a destination. Embrace the process, don't be afraid to make mistakes, and learn from your experiences. The satisfaction of creating something with your own hands is a rewarding experience that can be enjoyed by hobbyists of all skill levels.
So, gather your tools, choose a project, and get ready for an exciting weekend filled with creativity and accomplishment!
Gift Ideas: Crafting with Wood for Special Moments

Crafting with Wood: Unique and Meaningful Gifts for Special Moments
There's something deeply special about wooden gifts. Their natural beauty, warmth, and durability make them stand out as truly treasured possessions. Whether you're celebrating a birthday, anniversary, graduation, or simply want to show someone you care, crafting with wood offers a unique and meaningful way to express your love and appreciation.
Personalized Wooden Gifts for Every Occasion
The possibilities are truly endless when it comes to crafting with wood. You can create everything from simple and elegant to elaborate and intricate pieces. The key is to personalize the gift to make it truly special for the recipient.
Engraved Wooden Boxes
Engraved wooden boxes are perfect for holding special keepsakes, jewelry, or other treasured items. You can engrave the recipient's name, a meaningful date, or a special message to make it a truly personal gift.
Custom-Made Wooden Signs
Wooden signs can add a touch of rustic charm to any home. Create a custom sign with the recipient's name, a favorite quote, or a meaningful message. You can also make signs for specific rooms, like the kitchen or bedroom, or for special events like weddings or graduations.
Hand-Carved Wooden Sculptures
Hand-carved wooden sculptures are a truly unique and impressive gift. Whether you carve a realistic animal, an abstract design, or a personalized portrait, the recipient is sure to cherish this handcrafted piece for years to come.
Crafting with Wood for the Home
Wood is a versatile material that can be used to create a variety of beautiful and functional home décor items. From furniture to kitchenware, there are endless possibilities for crafting with wood to enhance the beauty and comfort of your home.
Wooden Cutting Boards
A personalized wooden cutting board is a practical and stylish addition to any kitchen. You can engrave the recipient's name, initials, or a special message to make it truly unique. You can also add decorative details, like a handle or a small cutout, to make it even more special.
Wooden Coasters
Wooden coasters are a perfect way to protect your furniture from spills and add a touch of rustic charm to your home. You can create coasters in a variety of shapes and sizes, and you can even personalize them with the recipient's name or initials.
Wooden Utensil Holders
Wooden utensil holders are a practical and stylish way to keep your kitchen organized. You can create holders in different shapes and sizes, and you can even personalize them with the recipient's name or initials.
Tips for Crafting with Wood
Crafting with wood can be a rewarding and enjoyable experience, but it’s important to have the right tools and techniques to create beautiful and durable pieces. Here are some tips to get you started:
- Choose the right wood. The type of wood you choose will affect the appearance and durability of your finished product. For example, hardwoods like oak and maple are strong and durable, while softwoods like pine and cedar are easier to work with.
- Use sharp tools. Sharp tools will make your job easier and safer. Make sure your saw blades, chisels, and sandpapers are sharp before you start working.
- Practice safety. Always wear safety glasses and gloves when working with wood. And make sure you have a well-ventilated workspace to avoid inhaling sawdust.
- Finish your project. A good finish will protect your wooden project from scratches, dents, and moisture. You can choose from a variety of finishes, including oil, wax, and polyurethane.
Crafting with wood is a rewarding and enjoyable hobby that can be used to create truly special gifts for any occasion. With a little creativity and patience, you can create beautiful and unique wooden gifts that will be treasured for years to come.
Tuesday, November 12, 2024
Modern DIY Coffee Table Plans with Free PDF Guide
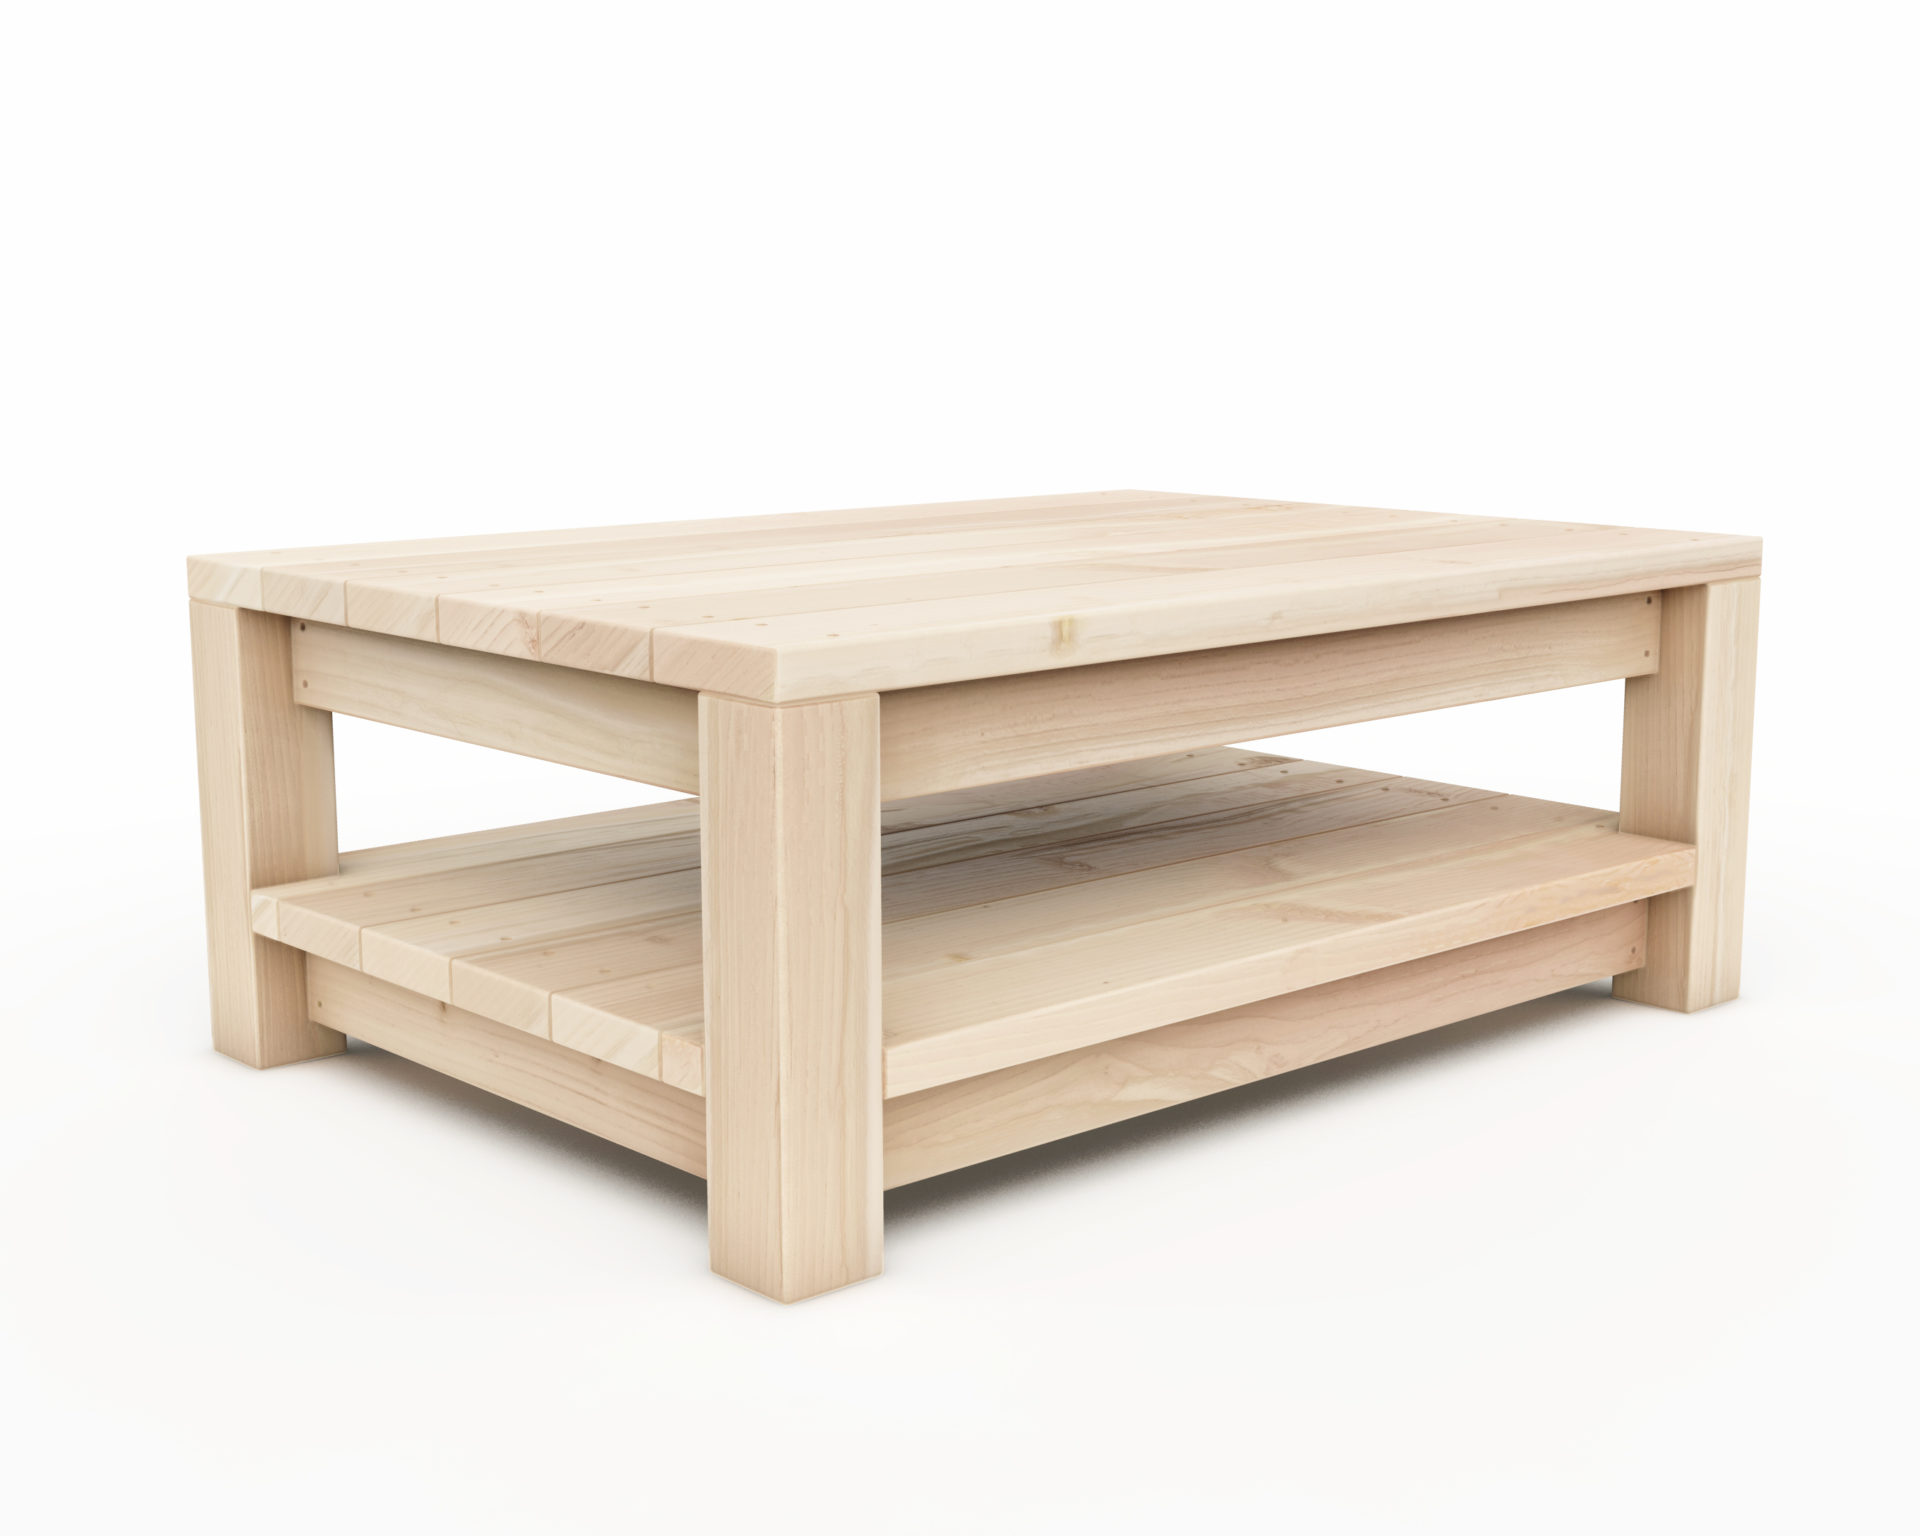
Modern DIY Coffee Table Plans with Free PDF Guide
A coffee table is a focal point in any living room, setting the tone for the entire space. While you can find countless options at furniture stores, building your own coffee table offers a unique opportunity to personalize your home with a piece that reflects your style and budget. This guide will walk you through creating a modern DIY coffee table, complete with free PDF plans for several designs.
The Appeal of DIY Coffee Tables
There are numerous benefits to building your own coffee table:
- Customization: You have complete control over the dimensions, materials, and style, ensuring a perfect fit for your space and aesthetic.
- Cost Savings: DIY projects can be significantly cheaper than buying a comparable piece of furniture.
- Sense of Accomplishment: There’s a great sense of satisfaction in creating something functional and beautiful with your own hands.
- Unique Design: You can create a truly one-of-a-kind piece that sets your home apart.
Choosing the Right Design
The first step is to decide on the design that best suits your needs and style. Modern coffee tables often feature clean lines, minimalist aesthetics, and functional elements. Here are a few popular designs you can explore:
Floating Coffee Table
This design creates a sense of lightness and airiness. It typically features a top panel supported by a slim, minimalist base, sometimes with a geometric or organic shape. Floating coffee tables are perfect for small spaces and create a visually appealing contrast against a larger sofa.
Industrial Coffee Table
Inspired by industrial design, these tables often use raw materials like metal and wood with visible joints and hardware. They typically feature sturdy, exposed frames and a simple top panel. Industrial coffee tables add a touch of ruggedness and authenticity to any space.
Mid-Century Modern Coffee Table
Mid-century modern designs are known for their elegant simplicity and focus on natural materials. You can find plans for tables with tapered legs, rounded corners, and a simple, uncluttered aesthetic. Consider using walnut, teak, or mahogany for a classic look.
Materials and Tools
The materials you choose will determine the look and feel of your coffee table. Here’s a list of common materials and essential tools:
Materials:
- Wood: Pine, plywood, walnut, oak, mahogany, or reclaimed wood are popular choices.
- Metal: Steel, aluminum, or iron can be used for legs or frames.
- Glass: Tempered glass can be used for the top or as decorative elements.
- Epoxy Resin: This can be used to create unique and durable tabletops.
- Wood Stain or Paint: To finish your table and achieve the desired look.
- Fasteners: Screws, bolts, dowels, and glue will be needed to assemble the table.
Tools:
- Circular Saw or Table Saw: For cutting wood.
- Drill/Driver: For drilling holes and driving screws.
- Sandpaper: To smooth surfaces and create a consistent finish.
- Measuring Tape, Ruler, and Pencil: For marking and measuring accurately.
- Level: To ensure your table is level and stable.
- Safety Glasses and Dust Mask: For protection while working with wood and tools.
Free PDF Guide
To make your DIY coffee table project even easier, we've prepared a free PDF guide with detailed plans for various modern coffee table designs. The guide includes:
- Cut Lists and Material Requirements: A breakdown of all the wood pieces needed for each design, including dimensions and quantities.
- Step-by-Step Instructions: Detailed instructions with images to guide you through each stage of the building process.
- Assembly Diagrams: Visual representations of how each piece of the table comes together.
- Tips and Troubleshooting: Helpful advice to overcome common challenges and ensure a successful outcome.
You can download the free PDF guide by [link to download].
Building Your Modern Coffee Table
Once you have your materials and tools, you can start building your coffee table. Follow these general steps:
- Cut the Wood: Carefully cut the wood pieces according to the dimensions provided in your chosen plan. Use a circular saw or table saw for accurate cuts.
- Sand the Surfaces: Smooth the edges and surfaces of all wood pieces using sandpaper. This will create a more refined finish and prepare the wood for stain or paint.
- Assemble the Frame: Join the wood pieces together using screws, bolts, dowels, or glue, as instructed in your plan. Use a level to ensure the frame is square and stable.
- Attach the Top Panel: Secure the top panel to the frame using screws or fasteners, depending on the design and material.
- Finish the Table: Apply stain or paint to the wood according to the manufacturer's instructions. Allow the finish to dry completely before use.
- Enjoy Your New Coffee Table: Once the finish is dry, your DIY coffee table is ready to be the centerpiece of your living room.
Tips for Success
Here are some tips for making your DIY coffee table project a success:
- Plan Ahead: Carefully read the plans and gather all necessary materials and tools before you start.
- Measure Twice, Cut Once: Accuracy is key to ensuring a well-fitting table. Double-check your measurements before cutting any wood.
- Use a Level: Ensure that the frame is square and level throughout the construction process.
- Don’t Rush: Take your time and work carefully. A rushed project can lead to errors and frustration.
- Sand Thoroughly: Smooth surfaces will improve the overall look of your table and create a more even finish.
- Apply a Protective Finish: Stain or paint your table to protect the wood and add a decorative touch.
Conclusion
Building your own modern DIY coffee table is a rewarding experience that allows you to create a unique and functional piece of furniture for your home. With the right plans, materials, and tools, you can turn your vision into reality. Embrace the challenge, and you’ll be amazed at what you can accomplish with a little effort and creativity.
How to Build a Firewood Storage Rack from Pallets

Building a Firewood Storage Rack from Pallets
Embrace the rustic charm and practicality of repurposing pallets into a functional and stylish firewood storage rack. This guide will walk you through the steps, from material selection to assembly, ensuring you have a sturdy and aesthetically pleasing solution for storing your firewood.
Materials and Tools
Before you begin, gather the necessary materials and tools for your project. These include:
Materials
- Pallets: Select sturdy, untreated wooden pallets. Aim for pallets with minimal damage or loose boards. You'll need at least two pallets, depending on the desired size of your rack.
- Wood screws: Choose screws of appropriate length and diameter to securely fasten the pallet pieces together. For added durability, use galvanized screws.
- Wood glue: Optional, but recommended for extra strength and a secure bond.
- Safety glasses: Essential for eye protection during the cutting and assembly process.
- Work gloves: Protect your hands from splinters and rough edges.
- Wood stain or paint: Optional, for enhancing the appearance and providing protection.
Tools
- Circular saw or hand saw: For cutting the pallets to size.
- Measuring tape: For accurate measurements and planning.
- Level: Ensure the rack is stable and level.
- Drill: For pre-drilling holes before screwing in the screws, preventing wood splitting.
- Screwdriver: For fastening the screws securely.
- Hammer: For gently tapping in the screws and for optional additional fastening methods.
- Clamps: Useful for holding pieces together while you screw them in.
Preparation and Design
Planning is crucial for a successful project. Consider these aspects before starting:
Assessing the Pallets
- Inspect the pallets for any damage or loose boards. Replace or reinforce any weak spots for a sturdy structure.
- Ensure the pallets are clean and free of debris.
- Consider the overall condition and the intended use of the rack. For heavy firewood, you might need stronger pallets.
Choosing a Design
- Basic A-Frame: This classic design is simple to build and offers ample storage space. Use two pallets, placing them in a triangular shape with the slats facing outward.
- Stacked Pallet Design: Create a taller storage solution by stacking multiple pallets vertically, securing them with screws or brackets.
- Wall-Mounted Pallet Rack: Attach the pallet to a wall, creating a space-saving solution for smaller areas. Consider using wall anchors for secure mounting.
- Custom Designs: Let your creativity flow! Experiment with cutting the pallets to form different shapes and designs for a truly unique rack.
Building the Firewood Storage Rack
Follow these steps to assemble your pallet firewood storage rack:
Step 1: Cutting the Pallets (if necessary)
Based on your chosen design, use a circular saw or hand saw to cut the pallets to the desired length and width. Ensure accurate measurements for a balanced and aesthetically pleasing rack.
Step 2: Assembling the Base
- For a basic A-frame design, place the two pallets in a triangular shape, facing outward.
- Secure the pallets together at the base by screwing through the top slats of one pallet into the bottom slats of the other.
- Use wood glue for added strength and a secure bond.
- Pre-drill holes before screwing to prevent wood splitting.
Step 3: Adding Additional Supports (optional)
Depending on the size and weight of your firewood, you might need additional supports to enhance the stability of the rack. Consider adding cross-braces between the pallets for added strength, or using vertical supports for tall stacked designs.
Step 4: Finishing Touches
- Sanding: Smooth any rough edges and splinters with sandpaper for a polished finish.
- Staining or Painting: Enhance the appearance and protect the wood by applying wood stain or paint. Choose a weather-resistant finish for outdoor use.
Tips and Considerations
Keep these tips in mind for a successful and functional firewood storage rack:
- Choose the Right Location: Select a well-ventilated location for your rack, preferably away from direct sunlight and rain to prevent warping and moisture damage.
- Fire Safety: Ensure your rack is adequately distanced from flammable materials and structures, especially in dry environments.
- Drainage: Consider adding a layer of gravel or stones at the bottom of the rack to facilitate drainage and prevent rotting.
- Personalize: Add your personal touch with decorative elements like metal accents, engraved wood plaques, or plants.
Conclusion
By repurposing pallets, you've created a practical and stylish firewood storage rack that complements your outdoor space. This guide has provided you with the necessary knowledge and steps to build a sturdy and functional rack. Remember to prioritize safety, choose the right materials, and personalize your design for a truly unique and rewarding project.
Squirrel Den Box Building Tips for DIY Enthusiasts

Building a Squirrel Den Box: A Guide for DIY Enthusiasts
If you're a nature lover with a passion for DIY, building a squirrel den box can be a rewarding project. Not only will you provide a safe and cozy shelter for these delightful creatures, but you'll also get to enjoy watching them scurry in and out of their new home. This article will guide you through the process, step by step, with helpful tips and tricks for a successful build.
Choosing the Right Location
The first step is to pick a suitable location for your squirrel den box. Squirrels prefer areas with ample food sources, like trees with nuts or nearby bird feeders. Ideally, choose a spot that's at least 10 feet off the ground, protecting the den from predators and harsh weather conditions.
Consider the following factors when selecting a location:
- Tree Size and Health: Ensure the tree is strong enough to support the weight of the den box.
- Exposure to Sunlight: Choose a location with adequate sunlight, but avoid direct exposure for long periods.
- Predator Protection: Look for a spot where the den box is inaccessible to predators like cats, hawks, or raccoons.
- Human Traffic: Choose a location that's not in a high-traffic area, allowing the squirrels to feel safe and undisturbed.
Materials and Tools
Gather the necessary materials and tools before you begin construction. You'll need:
- Wood: 1 x 6 or 1 x 8 inch pressure-treated lumber for the base, sides, and roof.
- Screws: Exterior-grade wood screws, 2-inch or longer.
- Hammer: For securing the nails or screws.
- Saw: A handsaw or circular saw for cutting the wood.
- Drill: For pre-drilling holes to prevent wood splitting.
- Measuring Tape: To ensure accurate dimensions for the den box.
- Level: To ensure the den box is level before mounting.
- Safety Glasses: Protect your eyes while working with power tools.
- Optional: Roofing shingles or metal roofing for added protection from the elements, paint for durability and aesthetics.
Building the Squirrel Den Box
Now, let's build the den box itself:
Step 1: Cutting the Wood
Cut the lumber into the following dimensions:
- Base: 1 piece, 12 inches wide x 16 inches long
- Sides: 2 pieces, 12 inches high x 12 inches wide
- Back: 1 piece, 12 inches high x 16 inches wide
- Roof: 1 piece, 16 inches wide x 18 inches long
Step 2: Assembling the Box
Start by attaching the sides to the base using screws. Next, attach the back piece to the base and sides. Leave a gap between the top edge of the back and the sides to create an opening for the squirrels to enter.
Step 3: Creating the Roof
Attach the roof to the box. It should overhang the sides by about an inch to protect the entrance from rain and snow. You can create a hinged roof for easy access to clean the den box.
Step 4: Adding Finishing Touches
Optional: You can add roofing shingles or metal roofing to the top of the den box for greater protection from the elements. You can also paint the den box with a weather-resistant paint to help it blend in with the surroundings.
Installing the Squirrel Den Box
Once the den box is assembled, it's time to install it in its chosen location:
- Secure Mounting: Attach the den box to the tree using sturdy brackets or bolts, ensuring that it's secure and won't fall.
- Leave Access: Ensure that the den box is easy to access in case you need to clean it or check on the squirrels.
- Enjoy: Sit back and enjoy watching the squirrels move into their new home.
Maintaining Your Squirrel Den Box
Once your den box is installed, remember to check it regularly for wear and tear. Clean it periodically to remove debris and droppings. Additionally, you can add extra nesting material like shredded paper or soft cloth to make it more comfortable for the squirrels.
By following these tips and using your creativity, you can build a welcoming and safe squirrel den box that will bring joy to your yard and provide shelter for these playful creatures. Happy building!
Crafting a Squirrel Den Box: Complete DIY Guide

Crafting a Squirrel Den Box: A Complete DIY Guide
Welcome to the world of squirrel-friendly DIY! Building a den box for your neighborhood squirrels isn't just a fun project; it's a rewarding way to support these charming creatures. This step-by-step guide will walk you through the process of crafting a comfortable and safe haven for your furry friends.
Choosing Your Materials
The foundation of your squirrel den box lies in the materials you select. Prioritize durability and weather resistance for a long-lasting home.
Wood
- Cedar: Known for its natural insect repelling properties and rot resistance, cedar is an excellent choice.
- Redwood: Similar to cedar, redwood is also a strong and weather-resistant wood option.
- Pine: A more affordable option, but pine requires proper treatment to prevent rot and insect damage.
For your den box, choose wood with a thickness of at least 1 inch. Avoid using pressure-treated lumber, as its chemicals can be harmful to squirrels.
Hardware
- Screws: Opt for galvanized or stainless steel screws for durability and resistance to rust.
- Brackets: These will help secure the roof to the base and ensure the box stays sturdy.
Designing Your Squirrel Den Box
Now that you've chosen your materials, it's time to envision your den box. Think about the size and shape that will be most suitable for your local squirrels.
- Size: A general guideline is to make the box at least 12 inches wide, 12 inches deep, and 18 inches high. Adjust these dimensions depending on the squirrel species in your area.
- Shape: The most common and practical shape is a rectangular box with a sloping roof. You can also add a decorative element like a small porch for added charm.
Step-by-Step Construction
Let's get building!
Step 1: Cut the Wood
Using your chosen wood, carefully measure and cut the following pieces:
- Two side panels: 12 inches wide x 18 inches high
- Two end panels: 12 inches deep x 18 inches high
- One bottom panel: 12 inches wide x 12 inches deep
- One roof panel: 14 inches wide x 16 inches deep (for a slightly overhanging roof)
Step 2: Assemble the Base
Align the bottom panel with the two side panels and one end panel. Secure them together using screws. Repeat this process with the other end panel to form a box-like structure.
Step 3: Attach the Roof
To create a sloping roof, cut a strip of wood (approximately 1 inch wide) to fit the length of the back of the roof panel. This will act as a support for the overhang. Attach the strip to the back of the roof panel using screws. Now, use brackets to securely attach the roof to the base, ensuring the overhang is maintained.
Step 4: Add an Entrance Hole
Carefully cut a circular hole, approximately 3 inches in diameter, on one side of the box. This will be the entrance for the squirrels. The height of the hole should be around 6 inches from the bottom of the box.
Step 5: Finishing Touches
To enhance the durability of your squirrel den box, consider:
- Adding a layer of paint or stain: This will protect the wood from weather damage and enhance its longevity.
- Creating ventilation: Drill a few small holes on the sides or back of the box to allow for proper ventilation.
Installing Your Squirrel Den Box
Once you've completed your squirrel den box, it's time to give it a home. Choose a location that meets the following criteria:
- Height: Place the box at least 10 feet off the ground to protect it from predators and weather elements.
- Shelter: Ensure the box is in a location with some overhead cover, such as a tree or dense shrubbery, for additional protection.
- Accessibility: Make sure the box is easily accessible for squirrels.
Enjoy Your Squirrel Den Box
Congratulations! You have crafted a safe and comfortable haven for your local squirrels. Sit back, relax, and enjoy the charm of these furry friends as they explore their new den. Keep in mind that squirrels may take some time to discover and claim their new home.
How to Build a Birdhouse with a Rustic Finish for Country Charm
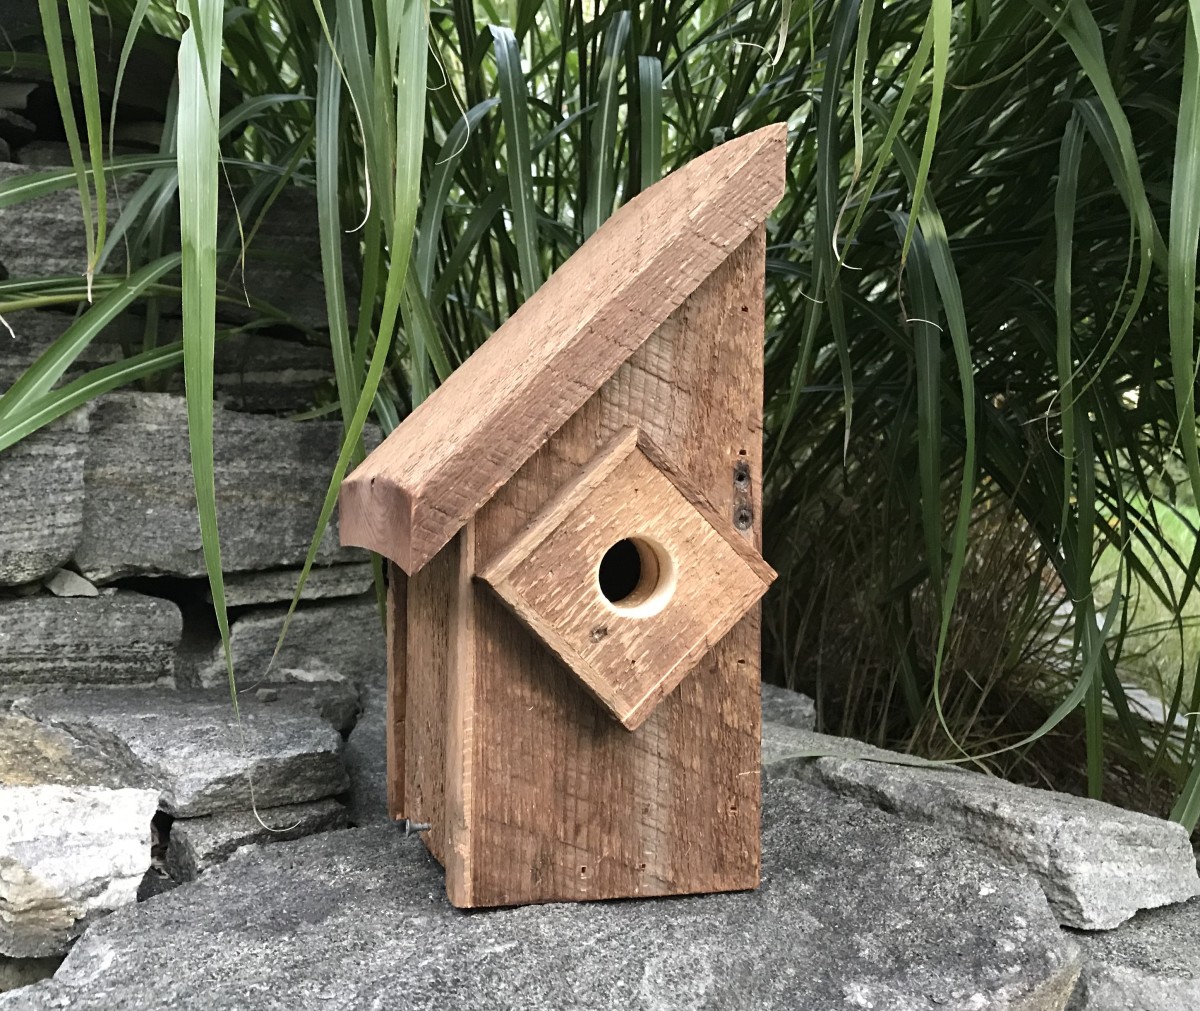
Build a Birdhouse with Rustic Charm: A Step-by-Step Guide
Hey there, fellow bird lovers! Are you looking to add a touch of country charm to your backyard? Building a rustic birdhouse is a fun and rewarding project that lets you create a welcoming haven for feathered friends. Whether you're a seasoned DIYer or a beginner, this guide will walk you through the steps, from choosing the right materials to giving your birdhouse that authentic, weathered look.
Gather Your Materials and Tools
Before you start hammering and sawing, make sure you've got all your supplies ready. You'll need:
- **Wood:** Choose a weather-resistant wood like cedar, redwood, or pine. For a truly rustic look, use reclaimed wood or salvaged pieces.
- **Wood glue:** A strong adhesive to hold the pieces together.
- **Screws:** Use screws specifically designed for outdoor use to prevent rust.
- **Saw:** A circular saw or a handsaw for cutting the wood.
- **Drill:** For drilling pilot holes before screwing and for creating the entrance hole.
- **Sandpaper:** To smooth out any rough edges and create a polished finish.
- **Measuring tape:** For accurate measurements.
- **Pencil:** For marking the wood.
- **Level:** To ensure your birdhouse sits straight and level.
- **Wood stain or paint:** (Optional) For adding color and protection.
- **Weatherproofing sealant:** (Optional) To protect the wood from the elements.
- **Birdhouse plans:** You can find plenty of free plans online or in DIY books.
Selecting Your Birdhouse Design and Size
Choosing the right design and size for your birdhouse is important for attracting the birds you want. There are so many beautiful and unique birdhouse designs out there, but it's crucial to keep in mind the types of birds you want to attract.
Research Bird Preferences
Think about which birds you see in your area and their nesting habits. Different birds prefer different sized entrances, depths, and internal dimensions. Some birds prefer houses with a flat roof, while others love a pitched roof for drainage.
Consider Your Location
The placement of your birdhouse matters too. Choose a spot that gets some sun but also offers shade from the hottest part of the day. A location out of the wind is best, and it's great if it's near a source of water.
Building the Birdhouse: A Step-by-Step Guide
Now that you've gathered your supplies and chosen your plan, let's get started! Here's a general guide to building your rustic birdhouse, but make sure to consult your chosen birdhouse plan for specific measurements and instructions.
Step 1: Cut the Wood Pieces
Using your saw, cut the wood pieces to the measurements specified in your birdhouse plan. Make sure your cuts are straight and precise. Be mindful of safety when using a saw and wear protective eyewear.
Step 2: Assemble the Base and Sides
Start by assembling the base of your birdhouse, usually four pieces of wood forming a square or rectangle. Glue the sides together, then secure them with screws. Apply a little wood glue to the edges before screwing. This will prevent the wood from splitting and create a stronger bond.
Step 3: Add the Roof
Next, attach the roof. Some birdhouse designs have a simple flat roof, while others have a pitched roof. Measure and mark the roof pieces and attach them to the base using glue and screws.
Step 4: Create the Entrance Hole
Carefully drill the entrance hole. Remember to choose the correct size based on the bird you want to attract. You'll need to drill a pilot hole first and then slowly enlarge it to the desired size.
Step 5: Add Interior Details
If your birdhouse plan includes interior features like a perch or a nesting platform, cut and assemble these pieces now.
Step 6: Sand and Finish
Once your birdhouse is assembled, sand it down thoroughly. Use different grits of sandpaper to get a smooth finish. This will create a more polished look and make it easier for birds to enter the house.
Adding Rustic Charm: Finishing Touches
Now comes the fun part! Let's give your birdhouse that unique rustic charm. Here are some techniques to try:
Weathering the Wood
For a truly rustic look, you can weather the wood yourself. You can achieve this with:
- **Sanding:** Use a wire brush or coarse sandpaper to create a distressed and aged effect.
- **Sun and Rain:** Allow your birdhouse to sit outside for a few weeks to naturally weather the wood.
- **Wood Stain:** Apply a wood stain in a darker color to accentuate the natural wood grain and give it a weathered look.
Adding Embellishments
To make your birdhouse even more charming, consider adding some rustic details:
- **Twigs:** Add a few small twigs to the roof for a natural touch.
- **Rustic Hardware:** Use old-fashioned hinges, handles, or screws. Look for salvaged hardware for an even more unique look.
- **Natural Elements:** Attach a small piece of bark, a pine cone, or a few dried flowers to the exterior.
Tips for Attracting Birds to Your Birdhouse
You've created a beautiful and rustic birdhouse, but you've got one more thing to do: make it inviting for birds! Here are some tips:
- **Choose the Right Location:** As we mentioned earlier, a location with some sun, shade, and protection from the wind is key.
- **Make it Safe:** Ensure the birdhouse is secure and won't fall or be knocked over.
- **Provide Water:** Birds need water for drinking and bathing. Set up a bird bath near the birdhouse or hang a bird feeder.
- **Keep it Clean:** Clean the birdhouse at the end of the nesting season to remove old nests and debris.
- **Be Patient:** It might take a while for birds to discover your new birdhouse. Don't worry, they'll eventually come to check it out!
There you have it! You're now equipped to build a rustic birdhouse that will be the envy of the neighborhood. Remember to have fun with the process, be creative, and personalize your birdhouse to make it truly unique. Enjoy the reward of watching your feathered friends make a home in your backyard!
Free PDF Plans for Simple Cold Frames

Free PDF Plans for Simple Cold Frames
Are you looking for an easy and affordable way to extend your growing season and give your plants a head start? Look no further than a cold frame! These simple structures can trap solar heat and protect your seedlings from frost and harsh weather, allowing you to start seeds earlier in the spring and harvest crops later in the fall.
The best part? You don't need to be a master builder to construct a cold frame. With readily available materials and a few basic tools, you can easily create a cold frame that suits your needs and style. And even better, there are numerous free PDF plans available online, making the whole process even more accessible.
Benefits of Using a Cold Frame
Cold frames offer a range of advantages for gardeners of all levels:
- Extend your growing season: By providing a protected environment, cold frames allow you to start seeds earlier in the spring and harvest crops later in the fall.
- Protect plants from harsh weather: Cold frames shield plants from frost, wind, and heavy rain, improving their chances of survival and growth.
- Promote faster growth: The trapped solar heat inside a cold frame creates a warmer microclimate, encouraging faster germination and growth.
- Increase yield: With the added protection and warmth, plants grown in cold frames often produce more bountiful harvests.
- Reduce costs: By starting seeds indoors and hardening them off in a cold frame before transplanting, you can save on expensive heating bills and greenhouse space.
Free PDF Cold Frame Plans: Where to Find Them
The internet is brimming with free PDF plans for cold frames. A quick search on Google or Pinterest will reveal a treasure trove of designs, from simple DIY structures to more elaborate and customizable options. Here are some reliable resources to get you started:
- Websites of garden centers and nurseries: Many garden supply stores offer free PDF plans for cold frames as a way to attract customers and promote gardening. Check out the websites of local and national garden centers.
- Online gardening communities and forums: Connect with fellow gardeners online through forums and communities like GardenWeb, Reddit's r/gardening, or Facebook groups. Many experienced gardeners share their own cold frame plans and modifications.
- YouTube tutorials: A plethora of YouTube channels showcase step-by-step cold frame construction tutorials. Search for "DIY cold frame" or "build a cold frame" to find detailed guides.
- Free plan websites: Websites like Ana White, Instructables, and Free Plans are dedicated to providing free woodworking and DIY plans, including cold frames.
Essential Materials for Building a Cold Frame
The specific materials you'll need for your cold frame will depend on the design you choose, but here are some common components:
- Wood: Commonly used for the frame and sashes, wood is sturdy, affordable, and easy to work with. Consider using pressure-treated lumber for the base to resist rot and moisture.
- Plastic sheeting: Provides insulation and protects your plants from the elements. You can use clear plastic for maximum light transmission or choose a more opaque material for additional warmth.
- Hardware: Include screws, hinges, brackets, and any fasteners necessary to assemble the structure and secure the sashes.
- Soil: Choose a good quality potting mix or garden soil to fill the cold frame and provide a suitable environment for your plants.
Tips for Choosing the Right Cold Frame Plan
With so many plans available, it can be overwhelming to choose the right one for you. Consider these factors when making your selection:
- Size and space: How much space do you have available in your garden? Choose a plan that fits your available area, leaving enough room for access and working space.
- Material: Think about the materials you have on hand and your budget. Some plans use recycled materials like pallets or windows, while others rely on new lumber.
- Construction difficulty: Choose a plan that matches your construction skills. There are beginner-friendly designs and more complex options for experienced builders.
- Ventilation: Consider how you'll provide adequate ventilation for your plants to prevent overheating. Look for plans with adjustable sashes or vents.
Start Growing Today with a Free Cold Frame Plan
Building a cold frame doesn't have to be complicated or expensive. By leveraging free PDF plans and readily available materials, you can easily extend your growing season and enjoy a bountiful harvest. So, why wait? Choose a plan, gather your supplies, and start building your own cold frame today! Happy gardening!
Building a Squirrel Den Box for Wildlife Lovers

Building a Squirrel Den Box: A Sanctuary for Fuzzy Friends
Hey there, fellow nature enthusiasts! Ever watch a squirrel scamper up a tree and think, "Wow, I bet that little guy could use a cozy place to call home?" Well, you're not alone. Building a squirrel den box is a fantastic way to provide shelter for these playful creatures and get a front-row seat to their adorable antics. It's a fun and rewarding project that's perfect for families, nature lovers, and anyone looking to add a touch of wildlife to their backyard.
Why Build a Squirrel Den Box?
Let's face it, squirrels are pretty darn cute. But there's more to this project than just providing a home for fluffy tails and bushy whiskers. Here's why building a squirrel den box is a great idea:
- Boost Biodiversity: Squirrels are integral to a healthy ecosystem. They help disperse seeds, control insect populations, and even play a role in soil aeration. By offering them a safe haven, you're contributing to a thriving backyard environment.
- Enjoy the Show: Who doesn't love watching squirrels frolic? A den box will encourage them to stay around your yard, giving you the chance to witness their playful antics and quirky behaviors. Trust me, the entertainment is endless.
- A Sanctuary for Wildlife: In urban areas, squirrels often face challenges like habitat loss and food scarcity. A den box provides a secure space for them to rest, raise their young, and escape the hustle and bustle of the city. You're essentially creating a tiny wildlife sanctuary in your own backyard.
- Eco-Friendly Fun: This project uses readily available materials and promotes natural living. It's a perfect way to connect with nature and contribute to a more sustainable environment.
Choosing the Right Location
Before you start hammering and sawing, let's talk about location, location, location! Finding the perfect spot for your squirrel den box is crucial to its success.
- Height is Key: Squirrels love to feel safe and secure, so aim for a spot at least 6-8 feet off the ground. This will deter predators and make them feel at ease. Attaching the box to a sturdy tree is ideal.
- Face It South: Just like us, squirrels appreciate a little sunshine. Position the box facing south to ensure it gets some warmth during the colder months. This will help keep them snug and cozy.
- Choose a Quiet Spot: Squirrels prefer peace and quiet, so find a spot away from noisy areas like busy roads or foot traffic. This will minimize disturbances and create a tranquil retreat for them.
- Consider Their Preferences: Squirrels are territorial creatures. Observe your yard and find areas where they're already active. Choosing a location near their existing pathways will increase the chances of them settling in.
Building Your Squirrel Den Box
Now, let's get our hands dirty! Building a squirrel den box is easier than you might think. You'll need some basic woodworking skills and a few tools. Here's a step-by-step guide to get you started:
Materials:
- One 12-inch square board for the base
- Four 8-inch square boards for the sides
- One 8-inch square board for the roof
- 1-inch screws
- Wood glue
- Weatherproof paint or stain (optional)
- Entrance hole drill bit (1-1/2 to 2 inches in diameter)
- Measuring tape
- Pencil
- Saw (circular or jigsaw)
- Drill
- Safety goggles
Instructions:
- Cut the Boards: Using a saw, cut the boards to the specified sizes. Make sure all edges are smooth and clean.
- Assemble the Box: Attach the side boards to the base using wood glue and screws. Drill pilot holes first to prevent splitting the wood.
- Create the Roof: Attach the roof board to the top of the box using wood glue and screws. You can create a simple flat roof or a more complex slanted one for better drainage.
- Add the Entrance: Drill a 1-1/2 to 2-inch hole in the front of the box for the squirrel entrance. Make sure it's high enough to avoid drafts and low enough for easy access.
- Finish and Secure: Sand any rough edges and apply a weatherproof paint or stain if desired. This will help protect the wood and extend the life of your den box. Secure the box to the tree using sturdy brackets and screws.
Tips for Success
Here are a few tips to make your squirrel den box irresistible to your furry tenants:
- Keep it Clean: Regularly clean the box with a mild soap solution. This will prevent the buildup of dirt, debris, and parasites.
- Offer a Soft Bed: Place a layer of soft bedding material like shredded paper, straw, or wood shavings inside the box. This will provide a comfortable and cozy space for the squirrels.
- Keep Food Close: Place a feeder nearby with squirrel-friendly treats like nuts, seeds, or fruit. This will encourage them to visit your den box.
- Patience is Key: It might take a while for squirrels to discover and settle into their new home. Don't be discouraged if they don't move in immediately. Just keep an eye out for signs of activity and trust that they'll eventually find their way.
Enjoy Your Squirrel Sanctuary
Building a squirrel den box is an enjoyable way to connect with nature and provide a safe haven for wildlife. By following these tips and instructions, you can create a cozy and inviting retreat for your furry neighbors. So, grab your tools, gather your materials, and get ready to build a sanctuary for the squirrels in your neighborhood. You'll be amazed at the joy and entertainment they bring to your backyard!
Diy grill gazebo plans for creating a luxurious outdoor kitchen
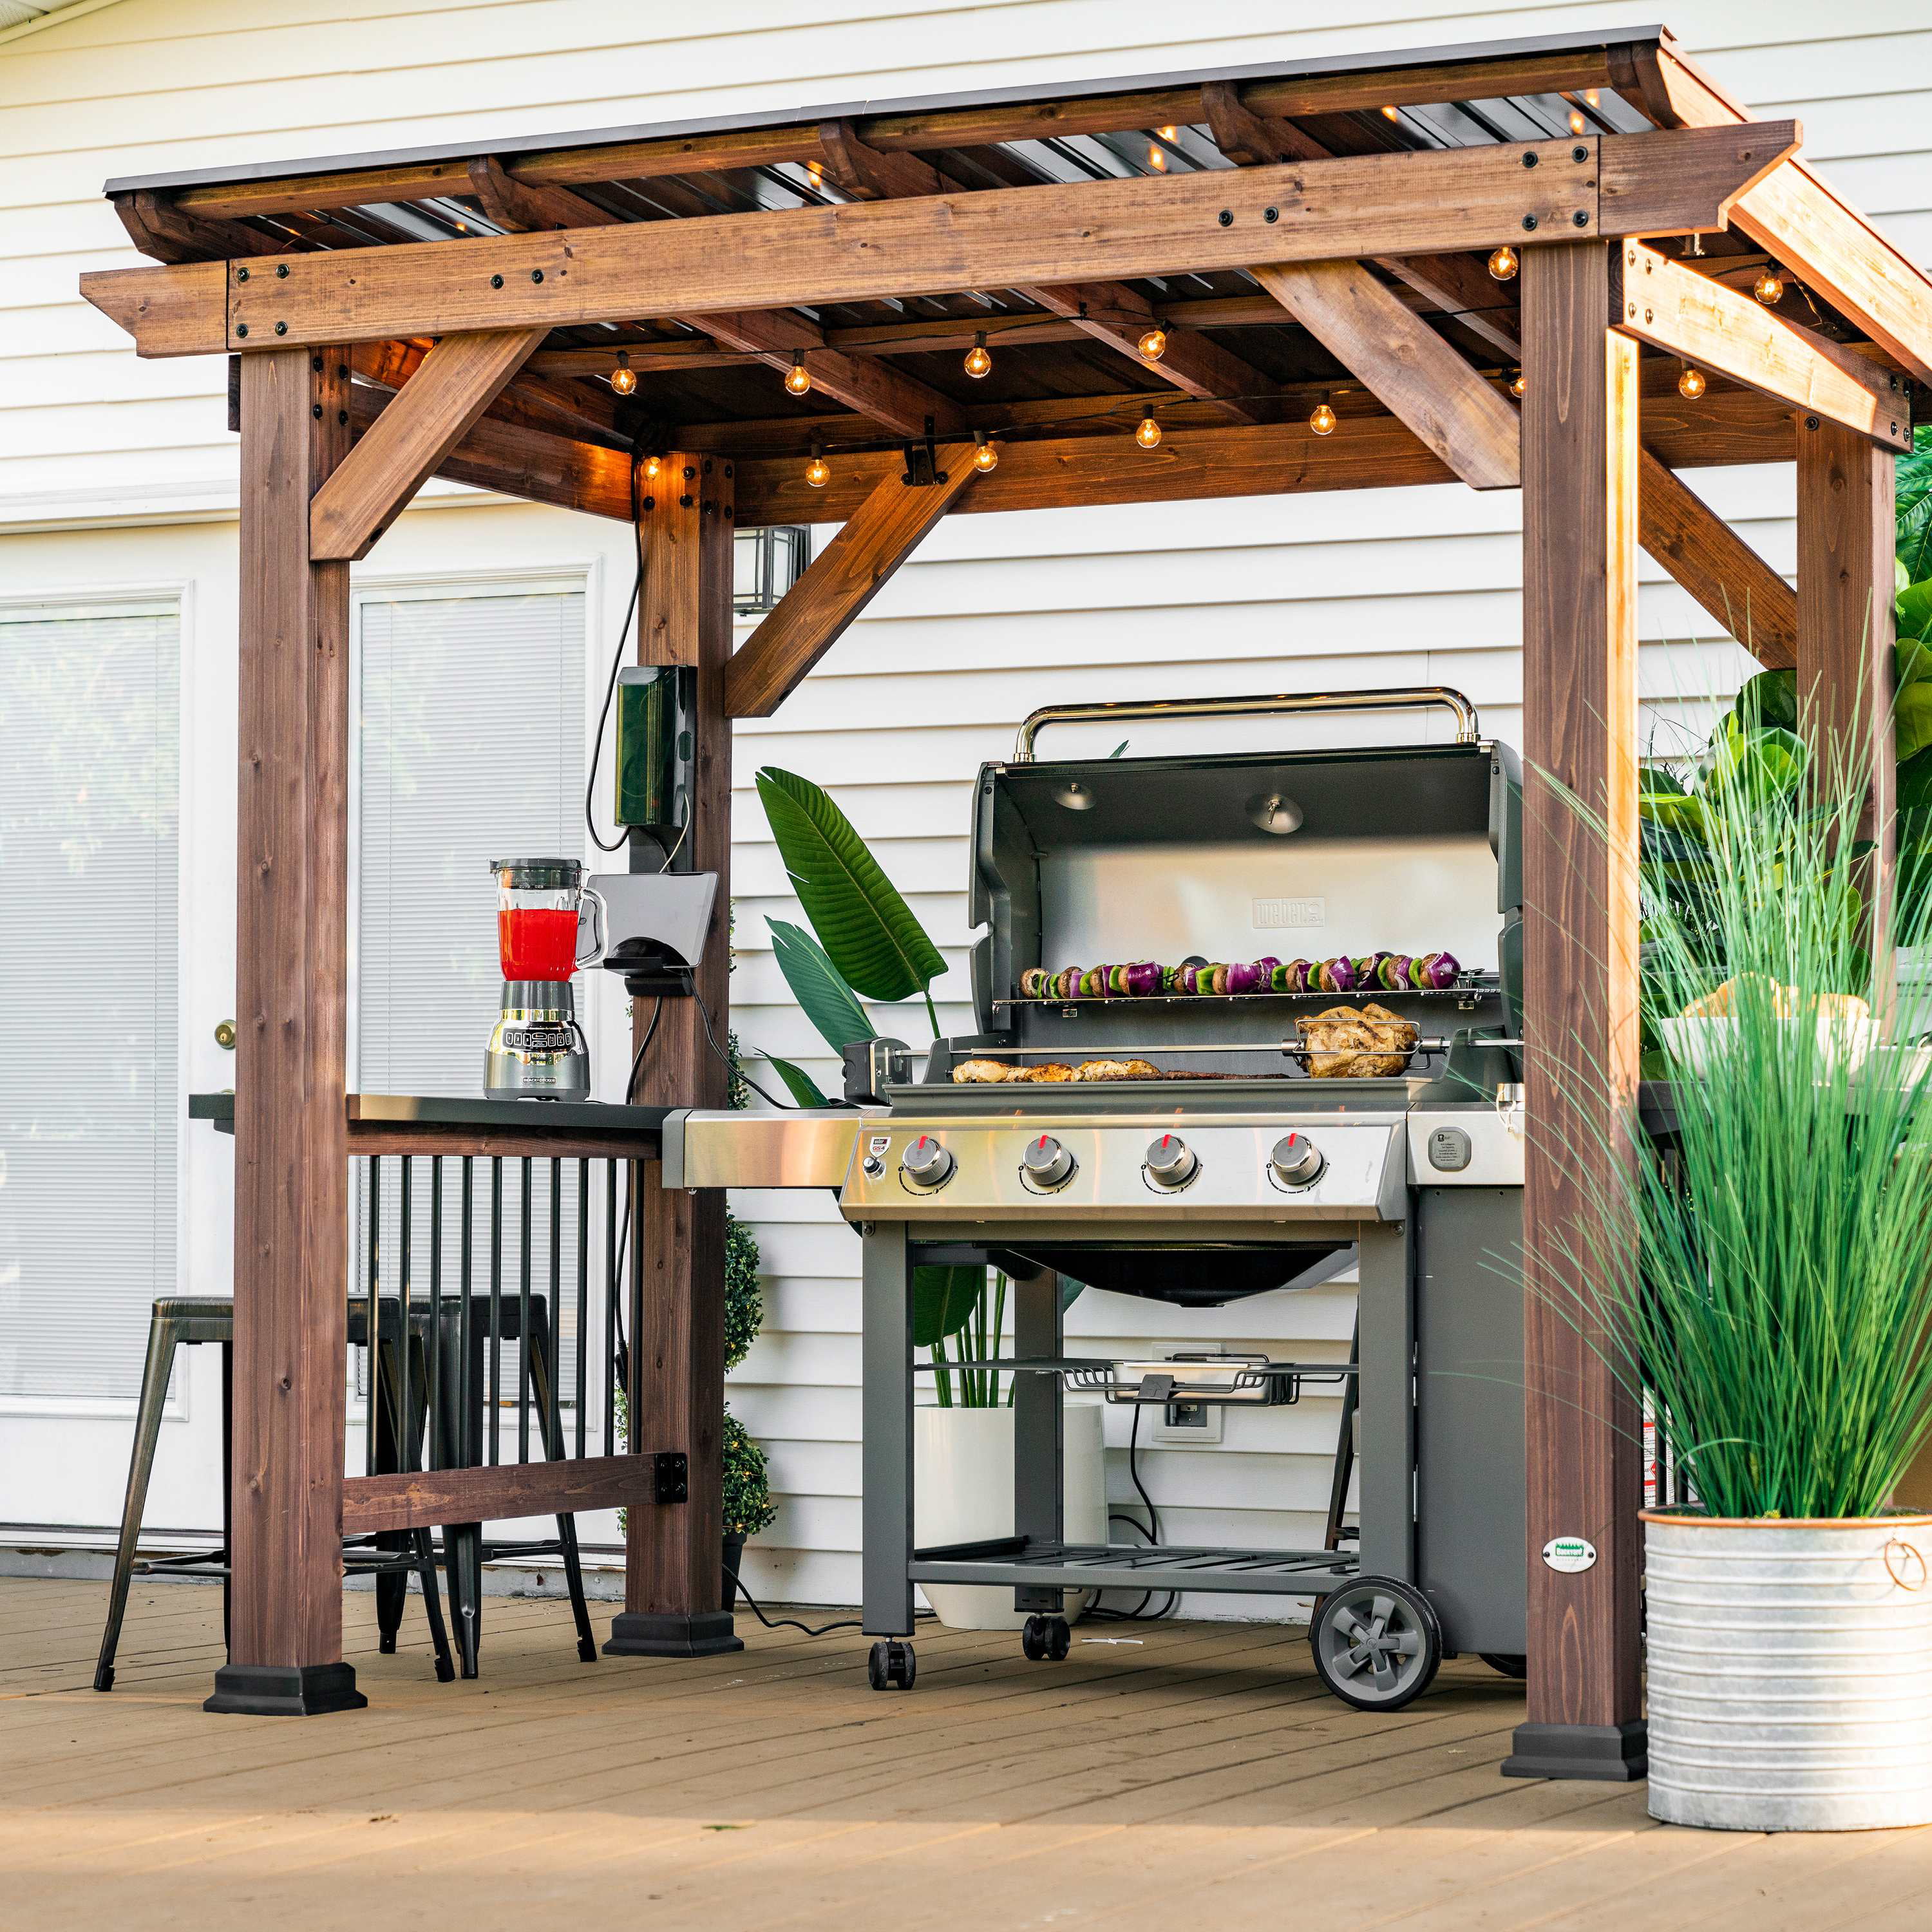
DIY Grill Gazebo Plans: Building Your Dream Outdoor Kitchen
Hey there, grilling enthusiasts! Are you tired of battling the elements while trying to cook up a storm? Wish you had a dedicated space for all your outdoor culinary adventures? Well, buckle up because we're about to dive into the exciting world of DIY grill gazebos!
A grill gazebo isn't just a fancy roof over your grill â€" it's the foundation for an epic outdoor kitchen. It's your personal oasis where you can entertain guests, whip up delicious meals, and enjoy the fresh air without the sun beating down on you or a sudden downpour ruining your plans.
And the best part? You can build it yourself! No need to spend a fortune on fancy contractors or pre-made structures. With a little planning, some handyman skills (or a willing friend who's got those skills), and a good dose of enthusiasm, you can create your own luxurious outdoor kitchen haven.
Planning Your Grill Gazebo: Laying the Foundation for Success
Before you grab your tools and start hammering, it's crucial to plan your grill gazebo like a seasoned architect. This phase is all about visualizing your dream space and ensuring you have the right materials and dimensions to make it happen.
1. Choose Your Style and Size
First things first, decide on the vibe you want. Do you picture a rustic wooden structure with charming latticework or a sleek modern design with metal accents? Maybe you want something minimalist and open or a cozy, enclosed space? Once you have a style in mind, consider the size. How much space do you have in your yard? What size grill will you be using? Do you want room for extra seating, a bar area, or storage? Think about your needs and desired level of functionality.
2. Pick a Location
Now, take a look at your backyard and find the perfect spot for your grill gazebo. Consider factors like:
- Sunlight: You want enough sun for grilling but also some shade for those hot summer days.
- Proximity to your house: You'll need easy access to electricity and water for your grill and any outdoor kitchen appliances.
- Privacy: Do you want a secluded space, or do you prefer being near the action?
- Drainage: Make sure your gazebo won't be in a low-lying area prone to flooding.
3. Gather Your Materials
Once you've got the style and location nailed down, it's time to think about the materials.
- Frame: You can choose from wood, metal, or even PVC pipe. Wood is classic and versatile, but metal can be more durable and require less maintenance. PVC is an affordable option for simpler structures.
- Roofing: Think about your local climate. Metal roofing is good for areas with heavy rain, while a fabric awning or shade sail can be a breezy option for sunny climates.
- Walls: You can keep it open or add partial walls for wind protection or privacy using lattice, screens, or curtains.
- Countertops: If you're building a full-blown outdoor kitchen, you'll need a sturdy countertop material. Stone, concrete, or even recycled wood can work beautifully.
- Storage: Plan for shelves, cabinets, or drawers to keep your tools, utensils, and grilling essentials organized.
Building Your Grill Gazebo: From Blueprint to Barbecue Haven
Okay, you've done the planning, gathered your supplies, and are ready to get your hands dirty. It's time to bring your outdoor kitchen to life!
1. Get the Groundwork Right
Start by preparing the foundation. You can either build a simple gravel base, a concrete pad, or use pre-made concrete blocks. Make sure your foundation is level and strong enough to support the weight of your gazebo.
2. Erect the Frame
Next, assemble the frame. This involves cutting, joining, and securing the vertical and horizontal beams using fasteners like screws, bolts, or nails. If you're using wood, make sure you treat it with a weather-resistant sealant to protect it from rot and decay.
3. Roofing and Walls
Now comes the fun part! Attach your chosen roofing material to the frame, making sure it's securely fastened and waterproof. If you're adding walls, build them using your chosen material, leaving space for doors or windows if desired.
4. Countertops and Storage
Add countertops to your grill gazebo to create functional workspaces for food prep and serving. Install cabinets, shelves, or drawers for storage.
5. Finishing Touches
You're nearing the finish line! Add finishing touches like lighting, fans, or decorative elements. Think about things like hanging planters, string lights for ambiance, or a small bar area for drinks.
Safety First: Building with Confidence
Building a grill gazebo is a rewarding project, but safety should always be your top priority. Here are some key tips:
- Read the Instructions: Follow any building instructions for your chosen materials carefully.
- Wear Protective Gear: Use safety glasses, gloves, and work boots to protect yourself from potential injuries.
- Use the Right Tools: Invest in quality tools and make sure they are in good working order.
- Be Aware of Electrical Work: If you're adding lighting or other electrical components, ensure you understand electrical safety guidelines and work with a licensed electrician if needed.
- Don't Overextend Yourself: Don't attempt complex construction projects if you lack experience. Consider hiring a professional for certain aspects, especially if you're working with heavy materials or high heights.
Creating Your Dream Outdoor Kitchen
Congratulations! You've built your very own grill gazebo. Now, it's time to personalize it and make it your own. Here are some ideas to transform it into your dream outdoor kitchen:
- Add a Sink: A small sink will come in handy for washing hands and cleaning up after grilling.
- Install a Mini-Fridge: Keep drinks cold and snacks within reach.
- Consider a Smoker: Elevate your grilling game with a dedicated smoker.
- Incorporate Seating: Add comfortable seating for your guests to enjoy the ambiance.
- Embrace Greenery: Create a welcoming atmosphere with plants and flowers around your gazebo.
- Add Some Ambiance: Consider using string lights, lanterns, or a fire pit for evening entertainment.
The Takeaway
Building a DIY grill gazebo is an adventure that will bring you a whole new level of outdoor cooking and entertaining enjoyment. It's a chance to create a unique space that reflects your personality and enhances your backyard. So, grab your tools, gather your supplies, and let your imagination run wild. You'll be enjoying delicious meals under the stars in no time!
Woodworking guide to build a desk with built-in power outlets
Building a Desk with Built-in Power Outlets: Your Ultimate Guide
Hey there, fellow woodworking enthusiasts! You know how it is â€" you're at your desk, hunched over your work, and suddenly realize your phone's about to die, or you need to plug in your laptop. Ugh, the struggle is real! But fret no more, my friends! Today, we're tackling the ultimate solution: building a desk with built-in power outlets. You'll never have to worry about tangled cords or power strips again. Let's get started!
Planning Your Powerhouse Desk
First things first, let's plan this baby out. You want to make sure your desk fits your needs and you’ve got enough power outlets for all your gadgets.
Step 1: Design & Dimensions
Grab your trusty notepad and pencil (or digital equivalent), and let's sketch out a basic design. Here's what to consider:
- Desk size: How much space do you need? Consider your chair, monitor, and any other equipment you'll be using.
- Shape: Traditional rectangular, sleek L-shaped, or a funky custom shape â€" the choice is yours!
- Power outlet placement: This is crucial! Think about where you'll be plugging in your devices and where you'll be sitting. Consider having outlets on both sides or even a hidden power center in the back.
- Material: We're talking wood, here! Solid hardwood, plywood, or even reclaimed lumber can work. Think about your budget and desired look.
Step 2: Power Outlet Options
Now, let's get into the exciting stuff â€" the power! You have a couple of great options here:
- Pre-wired Power Strips: These are super convenient! You can find them with various outlet configurations and even USB ports. Just make sure the cord length will reach your desired power source.
- DIY Power Center: For the more adventurous builders, you can create a custom power center within the desk. You'll need a junction box, electrical wire, and outlets. This option gives you complete control over placement and can be a very satisfying project.
Don't forget to check your local electrical codes and consult with a qualified electrician if you're unsure about anything. Safety first, always!
Tools & Materials
Time to gather your trusty tools and materials! Here's a basic list, but you might need some additional supplies depending on your design and chosen power outlet options:
- Wood: Your chosen wood for the desk top, frame, and any additional shelves or compartments.
- Woodworking tools: Saw, drill, sander, measuring tape, clamps, etc.
- Screws and fasteners: Appropriate for your chosen wood and project.
- Finishing supplies: Wood glue, paint, stain, or wood finish of your choice.
- Power outlet(s) or pre-wired power strip(s): Remember to choose the right type and configuration based on your needs.
- Electrical wire and junction box (if building a DIY power center): Consult your local electrician for the right size and type of wire.
- Safety gear: Gloves, safety glasses, and a dust mask.
Building the Desk
Alright, let's get our hands dirty! This part is where your woodworking skills really shine.
Step 1: Cutting and Assembling the Desk Frame
Start by cutting your wood pieces to the desired dimensions. Remember to account for any joinery or dadoes you might be using. Assemble the frame according to your plan, using strong glue and screws for a sturdy base.
Step 2: Creating the Power Outlet Space
Now it's time to integrate those power outlets! Here's where you'll need to be a bit more precise.
- Pre-wired power strip: Measure and cut a space for the power strip to fit snugly. You might need to route a channel for the cord if you're going for a clean, hidden look.
- DIY power center: Cut out a space for the junction box. Use a drill to create a hole in the back of the desk for the electrical wire to exit, leading to your power source.
Step 3: Installing the Power Outlets
This is where it gets exciting!
- Pre-wired power strip: Secure the power strip to your desk using screws or brackets. Remember to keep the cord accessible for plugging into your wall outlet.
- DIY power center: Wire your outlets to the junction box and to the incoming electrical wire. Double-check your wiring, and then attach the outlets to the desk surface.
If you're not comfortable working with electricity, it's always best to consult a licensed electrician.
Step 4: Building the Desk Top
Construct the top of your desk using your chosen wood. Make sure it's strong enough to support your equipment and resist wear and tear. You might want to use a solid wood slab for a luxurious look or plywood for a more affordable option.
Step 5: Finishing Touches
We're almost there! Give your desk a professional look with some finishing touches. Sand down the surface, apply wood stain or paint, and then add any protective sealant you desire. Finally, attach the desk top to the frame.
Safety Tips
Remember, safety should always be top of mind when working with electricity and power tools.
- Never work on electrical wiring when the power is on. Always turn off the power source at the breaker box.
- Use appropriate safety gear. Wear gloves, safety glasses, and a dust mask to protect yourself from injury and dust.
- Consult an electrician if you have any doubts. Don't hesitate to seek professional advice if you're not sure about any part of the electrical installation.
Beyond the Basics: Creative Ideas
Now that you've mastered the fundamentals, let's explore some creative possibilities to make your desk truly unique.
- Hidden compartments: Add a secret compartment to store cables, important documents, or even a snack stash!
- Built-in monitor stand: Elevate your monitor for better ergonomics and a cleaner desktop.
- Customizable desk organizers: Include shelves, drawers, or trays to keep your workspace tidy.
- LED lighting: Install some under-desk lighting to brighten up your workspace and add a cool touch.
- Reclaimed wood: Give your desk a rustic charm by using reclaimed wood for the frame or top.
Let's Wrap It Up
And there you have it! You've just built a desk with built-in power outlets â€" a true feat of woodworking and electrical ingenuity. Now go forth and enjoy your organized, powered-up workspace! Remember, it's all about the process â€" have fun, learn from your mistakes, and don't be afraid to experiment. Happy building, my friends!